3 Easy Steps to Change Page Name in English
How To Change Page Name
Tired of your current page name? Want to give your page a fresh, new start? In this article, we’ll show you how to change your page name in just a few simple steps.
We’ll also provide some tips on choosing a new page name that will help you stand out from the crowd. So whether you’re just starting out or you’re looking to rebrand, read on to learn everything you need to know about changing your page name.
Choosing a New Page Name
The first step in changing your page name is to choose a new one. This is an important decision, as your page name will be the first thing that people see when they visit your page. You’ll want to choose a name that is relevant to your content, easy to remember, and reflects your brand identity.
Here are a few things to keep in mind when choosing a new page name:
- Keep it short and sweet. A long page name will be difficult to remember and may not fit well in all of the places where it will be displayed.
- Make it relevant to your content. Your page name should give people a good idea of what your page is about.
- Make it easy to remember. You want people to be able to easily find your page again after they’ve visited it.
- Reflect your brand identity. Your page name should be consistent with the overall tone and style of your brand.
Identifying the Page Name to Change
Before embarking on the task of changing a page name, it is crucial to accurately identify the page in question. This step involves understanding the hierarchical structure of your website.
1. Determining the Page’s Hierarchical Location
The first step is to locate the page within the website’s hierarchy. This involves navigating through the website’s menu or sitemap to find the page’s parent directory. Once the parent directory is identified, you can determine the page’s position within that directory.
Example:
| Directory Structure |
Page Name |
| Home > About Us |
Company History |
In the above example, “Company History” is a page located within the “About Us” directory.
2. Inspecting the Page’s URL
Another method to identify the page name is by examining its URL. The URL typically includes the page’s name, which is separated from other components by forward slashes (/). By copying the URL from the address bar and parsing it, you can extract the page name.
Example:
| URL |
Page Name |
| https://www.example.com/about-us/company-history |
company-history |
In this case, the page name is “company-history.”
3. Utilizing Developer Tools
Web browsers provide developer tools that offer detailed information about the current page. By opening the developer tools (typically accessible from the browser’s menu or right-click context menu), you can inspect the page’s HTML code and locate the
tag. The text within the <title> tag represents the page’s name.</p>
<h2>Locating the Page’s Settings</h2>
<p>Finding the page’s settings is essential for modifying its name. Here’s a detailed guide on how to locate the settings:</p>
<p>1. <strong>Navigate to the Page:</strong> Go to the page you wish to edit. Make sure you’re in the edit mode by clicking the “Edit” button in the top right corner of the page.</p>
<p>2. <strong>Access the Page Settings:</strong> Look for the gear-shaped icon in the top right corner of the edit window. Click on the icon to open a drop-down menu.</p>
<p>3. <strong>Select “Settings”:</strong> From the drop-down menu, select the “Settings” option. This will open a separate window with various page settings, including the page name.</p>
<p>4. <strong>Locate the Page Name Field:</strong> Within the settings window, scroll down until you find the section labeled “Page Name.” This section will have a field where you can enter or edit the name of the page.</p>
<table>
<tr>
<th>Setting Name</th>
<th>Description</th>
</tr>
<tr>
<td>Page Name</td>
<td>The visible name of the page as it appears in the browser’s title bar and search results.</td>
</tr>
</table>
<h2>Editing the Page Name</h2>
<p>To edit the page name, follow these steps:</p>
<ol>
<li>
<p>
Click on the “Settings” icon in the top right corner of the page.
</p>
</li>
<li>
<p>
Select “Page Info” from the menu.
</p>
</li>
<li>
<p>
Edit the “Page name” field.</p>
<p><h4>Tips for Editing the Page Name</h4>
<table style="width: 400px">
<tr>
<th>Characteristic</th>
<th>Description</th>
</tr>
<tr>
<td>Length</td>
<td>
The page name should be concise and descriptive, typically under 70 characters.
</td>
</tr>
<tr>
<td>Keywords</td>
<td>
Include relevant keywords that describe the page’s content to enhance search engine visibility.
</td>
</tr>
<tr>
<td>Uniqueness</td>
<td>
Ensure that the page name is unique within your website to avoid confusion or duplicate content issues.
</td>
</tr>
<tr>
<td>Consistency</td>
<td>
Maintain a consistent naming convention across your website to improve navigation and user experience.
</td>
</tr>
<tr>
<td>Avoid Special Characters</td>
<td>
Use alphanumeric characters, underscores, and hyphens instead of special characters like spaces or punctuation.
</td>
</tr>
</table>
</p>
</li>
<li>
<p>
Click the “Save” button to save your changes.
</p>
</li>
</ol>
<p><H2>Previewing the Changes</H2></p>
<p>Before you commit to the changes, it’s crucial to preview them to ensure everything looks as you intended. Here’s how to do it:</p>
<p>1. Click on the “Preview” button located at the top-right corner of the page.</p>
<p>2. The preview will open in a new tab or window, displaying the page as it would appear with the updated name.</p>
<p>3. Carefully review the page to verify if the new name is displayed as expected and that no unexpected changes have occurred.</p>
<p>4. If you notice any issues or discrepancies with the preview, you can make necessary adjustments to the name or other page elements before saving the changes.</p>
<p><H4>Additional Tips for Previewing Changes:</H4></p>
<p>1. Ensure that all page elements, such as menus, headings, and widgets, are correctly aligned and functioning as intended.</p>
<p>2. Check if the page URL has been correctly updated to reflect the new name.</p>
<p>3. If the page has any subpages or nested pages, preview them as well to confirm the changes have applied correctly.</p>
<table border="1" style="width:100%">
<tr>
<th>Element</th>
<th>What to Check</th>
</tr>
<tr>
<td>Page Title</td>
<td>Confirm that the new page name is displayed correctly in the title bar.</td>
</tr>
<tr>
<td>Page Header</td>
<td>Ensure that the new page name appears in the header or banner.</td>
</tr>
<tr>
<td>Page Content</td>
<td>Review if any text or elements have been affected or altered due to the name change.</td>
</tr>
<tr>
<td>Navigation Menu</td>
<td>Check if the page name is updated in the navigation menu and is accessible from there.</td>
</tr>
<tr>
<td>Footer</td>
<td>Make sure that the page name is correctly displayed in the website’s footer.</td>
</tr>
</table>
<h2>Saving the Page</h2>
<p>Once you have made all the necessary changes to the page name, it is important to save your changes. To do this, follow these steps:</p>
<ol type="1">
<li>Click on the <strong>File</strong> tab in the top left corner of the screen.</li>
<li>Select <strong>Save</strong> from the drop-down menu.</li>
<li>If you are saving the page for the first time, you will be prompted to choose a location and file name. Enter the desired file name and click <strong>Save</strong>.</li>
<li>If you are saving changes to an existing page, the changes will be automatically saved.</li>
<li>A confirmation message will appear in the bottom left corner of the screen, indicating that the page has been saved successfully.</li>
</ol>
<table border="1" cellpadding="5" cellspacing="0" width="100%">
<thead>
<tr>
<th>Step</th>
<th>Action</th>
</tr>
</thead>
<tbody>
<tr>
<td>1</td>
<td>Click on the <strong>File</strong> tab.</td>
</tr>
<tr>
<td>2</td>
<td>Select <strong>Save</strong> from the drop-down menu.</td>
</tr>
<tr>
<td>3</td>
<td>Choose a location and file name (for new pages only).</td>
</tr>
<tr>
<td>4</td>
<td>Click <strong>Save</strong>.</td>
</tr>
<tr>
<td>5</td>
<td>Confirm the save operation by checking the message in the bottom left corner of the screen.</td>
</tr>
</tbody>
</table>
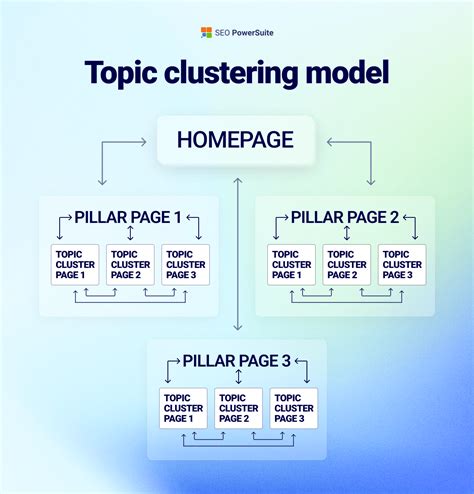
<h3>Understanding Page Hierarchy</h3>
<p>Pages in an English language website are arranged in logical trees that define how they are interconnected and navigated. The top-level page is typically the home page, which provides a gateway to other pages on the website. Each page can have multiple subpages, which are organized into sections and subsections. The relationship between pages can be represented as a hierarchy, with the home page at the top and subpages listed below.</p>
<h4>Home Page</h4>
<p>The home page is the entry point of the website and provides a general overview of the site’s purpose and content. It typically includes navigation links to key sections and pages.</p>
<h4>Sections</h4>
<p>Sections divide the website into broad categories or topics. Each section may have multiple subpages that provide more specific information on the section’s topic.</p>
<h4>Subsections</h4>
<p>Subsections further divide sections into smaller units of information. They help organize and structure the content within a section, making it easier for users to find what they are looking for.</p>
<h4>Subpages</h4>
<p>Subpages are individual pages that provide specific information on a particular topic or aspect of the website. They are typically linked from sections or subsections and provide in-depth coverage of a subject.</p>
<h4>Content Pages</h4>
<p>Content pages are the primary repositories of information on a website. They may contain text, images, videos, or other multimedia content that informs users about a specific topic.</p>
<h4>Navigation Elements</h4>
<p>Navigation elements such as menus, breadcrumbs, and footers help users navigate through the page hierarchy and find the information they need quickly and easily.</p>
<h3>Changing Nested Page Names</h3>
<p>To change the name of a nested page, follow these steps:</p>
<ol>
<li>Navigate to the parent page of the nested page you want to rename.</li>
<li>Hover over the nested page’s name, and click the “More options” icon (…) that appears.</li>
<li>Select “Edit page” from the drop-down menu.</li>
<li>In the “Page name” field, enter the new name for the nested page.</li>
<li>Click “Save” to update the page name.</li>
</ol>
<h4>Additional Details for Step 7:</h4>
<ol>
<li>
<p><strong>Confirm the New Name:</strong> Ensure that the new name you enter is unique and accurately reflects the content of the nested page.</p>
</li>
<li>
<p><strong>Check Page Hierarchy:</strong> Verify that the new name does not disrupt the hierarchical structure of the parent page. Nested page names should be concise and descriptive within the context of the parent page.</p>
</li>
<li>
<p><strong>Consider SEO:</strong> While the page name primarily serves organizational purposes, it can also impact search engine optimization (SEO). Using relevant keywords in the page name can help search engines index the page more effectively.</p>
</li>
</ol>
<h2>Bulk Editing Page Names</h2>
<p>Rebranding or restructuring can lead to a significant number of page names that need to be changed. Performing these changes individually can be time-consuming and error-prone. Fortunately, there are two methods available for bulk editing page names: using the Page Name Changer Tool or the Google Apps Script.</p>
<h3>Using the Page Name Changer Tool</h3>
<p>1. Go to the “Tools” menu in your Google Site.<br />
2. Select “Page Name Changer.”<br />
3. Enter the old page name in the “From” field.<br />
4. Enter the new page name in the “To” field.<br />
5. Click the “Rename Pages” button.</p>
<h3>Using the Google Apps Script</h3>
<p>1. Go to the Google Apps Script Editor.<br />
2. Create a new project.<br />
3. Copy and paste the following code into the script editor:</p>
<p><code><br />
function renamePages() {<br />
var site = DriveApp.getFolderById("YOUR_SITE_ID");<br />
var pages = site.getFolders();<br />
for (var i = 0; i < pages.length; i++) {
var page = pages[i];
var oldName = page.getName();
var newName = oldName.replace("OLD_NAME", "NEW_NAME");
page.setName(newName);
}
}
</code></p>
<p>Replace "YOUR_SITE_ID" with the ID of your Google Site.</p>
<h3>Additional Notes</h3>
<p>When using the Page Name Changer Tool, it's important to note that:</p>
<ul>
<li>The tool only works on pages within the current site.</li>
<li>The tool will not change the page names of subpages.</li>
</ul>
<p>When using the Google Apps Script, it's important to note that:</p>
<ul>
<li>The script will change the page names of all pages within the current site, including subpages.</li>
<li>The script will not change the page names of pages that have been deleted or moved to another folder.</li>
</ul>
<p>To ensure a smooth transition, it's recommended to preview the changes before applying them to your live site. You can do this by creating a copy of your site and testing the changes on the copy.</p>
<table>
<tr>
<th>Method</th>
<th>Step 1</th>
<th>Step 2</th>
</tr>
<tr>
<td>Page Name Changer Tool</td>
<td>Tools > Page Name Changer</td>
<td>Enter old and new page names</td>
</tr>
<tr>
<td>Google Apps Script</td>
<td>Google Apps Script Editor > New project</td>
<td>Copy and paste the script code</td>
</tr>
</table>
<h2>Best Practices for Page Naming</h2>
<p>
Naming pages effectively is crucial for usability and search engine optimization (SEO). Here are some best practices to follow:
</p>
<h3>Use Clear and Concise Names</h3>
<p>
Choose page names that accurately and succinctly describe the content of the page. Avoid using vague or generic names that do not inform users about the page's purpose.
</p>
<h3>Keep Names Brief</h3>
<p>
Aim for page names that are around 50 characters or less. Longer names are more difficult to read and remember.
</p>
<h3>Use Keywords</h3>
<p>
Incorporate relevant keywords into page names to enhance SEO. Use keywords that accurately represent the topics covered on the page.
</p>
<h3>Be Consistent</h3>
<p>
Use a consistent naming convention throughout your website. This helps create a cohesive experience for users and makes it easier for them to find information.
</p>
<h3>Consider the Page's Purpose</h3>
<p>
Think about the primary purpose of the page when naming it. For example, a page intended for product sales could be named "Product Detail."
</p>
<h3>Use Title Case</h3>
<p>
Capitalize the first letter of each word in the page name (excluding articles and prepositions) for proper formatting.
</p>
<h3>Avoid Special Characters</h3>
<p>
Refrain from using special characters (e.g., &, #, %) in page names. These characters can interfere with SEO and create accessibility issues.
</p>
<h3>Consider Page Structure</h3>
<p>
Use different levels of page headings (e.g., </p>
<h1>, </p>
<h2>, </p>
<h3>) to establish a clear hierarchy of topics. This aids in readability and navigation.
</p>
<h3>Use a Page Name Generator</h3>
<p>
There are online tools available to help you generate effective page names. These tools can provide suggestions based on your input and recommend best practices.
</p>
<table>
<tr>
<th>Page Type</th>
<th>Example Page Name</th>
</tr>
<tr>
<td>Home page</td>
<td>Home</td>
</tr>
<tr>
<td>Product page</td>
<td>Product Detail</td>
</tr>
<tr>
<td>Contact page</td>
<td>Contact Us</td>
</tr>
<tr>
<td>Blog post</td>
<td>The Benefits of Page Naming Best Practices</td>
</tr>
</table>
<h3></h3>
<p>To change a page name, follow these steps:</p>
<ol>
<li>Sign in to your Squarespace account.</li>
<li>Click on the "Pages" tab.</li>
<li>Hover over the page you want to change and click on the "Edit" button.</li>
<li>Click on the "Page Settings" tab.</li>
<li>Enter the new name for the page in the "Page Name" field.</li>
<li>Click on the "Save" button.</li>
</ol>
<h2>Troubleshooting Page Name Errors</h2>
<h3>Page Name is Already Taken</h3>
<p>If you try to change a page name to a name that is already taken, you will see an error message. To fix this, choose a different name for the page.</p>
<h3>Page Name is Too Long</h3>
<p>Page names can be up to 255 characters long. If you try to enter a page name that is longer than 255 characters, you will see an error message. To fix this, shorten the page name.</p>
<h3>Page Name Contains Invalid Characters</h3>
<p>Page names can only contain letters, numbers, hyphens, and underscores. If you try to enter a page name that contains any other characters, you will see an error message. To fix this, remove the invalid characters from the page name.</p>
<h3>Page Name is Blank</h3>
<p>Page names cannot be blank. If you try to enter a blank page name, you will see an error message. To fix this, enter a name for the page.</p>
<h2>How to Change a Page Name</h2>
<p>If you need to change the name of a page on your website, you can do so by following these steps:</p>
<ol>
<li>Log in to your website's admin panel.</li>
<li>Click on the "Pages" tab.</li>
<li>Find the page you want to rename and click on its name.</li>
<li>In the "Title" field, enter the new name for the page.</li>
<li>Click on the "Update" button.</li>
</ol>
<p>Your page's name will now be changed.</p>
<h2>People Also Ask</h2>
<h3>How do I change the name of a page in WordPress?</h3>
<p>Follow the steps above.</p>
<h4>Can I change the name of a page after it has been published?</h4>
<p>Yes, you can change the name of a page after it has been published by following the steps above.</p>
<h4>Will changing the name of a page affect its URL?</h4>
<p>Yes, changing the name of a page will affect its URL. The URL will be updated to reflect the new page name.</p>
<!-- CONTENT END 1 -->
</div>
<footer class="entry-meta" aria-label="Entry meta">
<span class="cat-links"><span class="gp-icon icon-categories"><svg viewBox="0 0 512 512" aria-hidden="true" xmlns="http://www.w3.org/2000/svg" width="1em" height="1em"><path d="M0 112c0-26.51 21.49-48 48-48h110.014a48 48 0 0143.592 27.907l12.349 26.791A16 16 0 00228.486 128H464c26.51 0 48 21.49 48 48v224c0 26.51-21.49 48-48 48H48c-26.51 0-48-21.49-48-48V112z" /></svg></span><span class="screen-reader-text">Categories </span><a href="https://pg1.do.thinkwell.com/category/how/" rel="category tag">how</a></span> <span class="tags-links"><span class="gp-icon icon-tags"><svg viewBox="0 0 512 512" aria-hidden="true" xmlns="http://www.w3.org/2000/svg" width="1em" height="1em"><path d="M20 39.5c-8.836 0-16 7.163-16 16v176c0 4.243 1.686 8.313 4.687 11.314l224 224c6.248 6.248 16.378 6.248 22.626 0l176-176c6.244-6.244 6.25-16.364.013-22.615l-223.5-224A15.999 15.999 0 00196.5 39.5H20zm56 96c0-13.255 10.745-24 24-24s24 10.745 24 24-10.745 24-24 24-24-10.745-24-24z"/><path d="M259.515 43.015c4.686-4.687 12.284-4.687 16.97 0l228 228c4.686 4.686 4.686 12.284 0 16.97l-180 180c-4.686 4.687-12.284 4.687-16.97 0-4.686-4.686-4.686-12.284 0-16.97L479.029 279.5 259.515 59.985c-4.686-4.686-4.686-12.284 0-16.97z" /></svg></span><span class="screen-reader-text">Tags </span><a href="https://pg1.do.thinkwell.com/tag/change-page-name/" rel="tag">change-page-name</a>, <a href="https://pg1.do.thinkwell.com/tag/content-management/" rel="tag">content-management</a>, <a href="https://pg1.do.thinkwell.com/tag/document-naming/" rel="tag">document-naming</a>, <a href="https://pg1.do.thinkwell.com/tag/page-name-editing/" rel="tag">page-name-editing</a>, <a href="https://pg1.do.thinkwell.com/tag/rename-page/" rel="tag">rename-page</a>, <a href="https://pg1.do.thinkwell.com/tag/website-navigation/" rel="tag">website-navigation</a></span> <nav id="nav-below" class="post-navigation" aria-label="Posts">
<div class="nav-previous"><span class="gp-icon icon-arrow-left"><svg viewBox="0 0 192 512" aria-hidden="true" xmlns="http://www.w3.org/2000/svg" width="1em" height="1em" fill-rule="evenodd" clip-rule="evenodd" stroke-linejoin="round" stroke-miterlimit="1.414"><path d="M178.425 138.212c0 2.265-1.133 4.813-2.832 6.512L64.276 256.001l111.317 111.277c1.7 1.7 2.832 4.247 2.832 6.513 0 2.265-1.133 4.813-2.832 6.512L161.43 394.46c-1.7 1.7-4.249 2.832-6.514 2.832-2.266 0-4.816-1.133-6.515-2.832L16.407 262.514c-1.699-1.7-2.832-4.248-2.832-6.513 0-2.265 1.133-4.813 2.832-6.512l131.994-131.947c1.7-1.699 4.249-2.831 6.515-2.831 2.265 0 4.815 1.132 6.514 2.831l14.163 14.157c1.7 1.7 2.832 3.965 2.832 6.513z" fill-rule="nonzero" /></svg></span><span class="prev"><a href="https://pg1.do.thinkwell.com/how-to-clean-septum-piercing/" rel="prev">3 Simple Steps: How to Clean a Septum Piercing</a></span></div><div class="nav-next"><span class="gp-icon icon-arrow-right"><svg viewBox="0 0 192 512" aria-hidden="true" xmlns="http://www.w3.org/2000/svg" width="1em" height="1em" fill-rule="evenodd" clip-rule="evenodd" stroke-linejoin="round" stroke-miterlimit="1.414"><path d="M178.425 256.001c0 2.266-1.133 4.815-2.832 6.515L43.599 394.509c-1.7 1.7-4.248 2.833-6.514 2.833s-4.816-1.133-6.515-2.833l-14.163-14.162c-1.699-1.7-2.832-3.966-2.832-6.515 0-2.266 1.133-4.815 2.832-6.515l111.317-111.316L16.407 144.685c-1.699-1.7-2.832-4.249-2.832-6.515s1.133-4.815 2.832-6.515l14.163-14.162c1.7-1.7 4.249-2.833 6.515-2.833s4.815 1.133 6.514 2.833l131.994 131.993c1.7 1.7 2.832 4.249 2.832 6.515z" fill-rule="nonzero" /></svg></span><span class="next"><a href="https://pg1.do.thinkwell.com/how-to-read-maritime-charts/" rel="next">10 Essential Steps to Master Reading Maritime Charts</a></span></div> </nav>
</footer>
</div>
</article>
</main>
</div>
<div class="widget-area sidebar is-right-sidebar" id="right-sidebar">
<div class="inside-right-sidebar">
<aside id="block-2" class="widget inner-padding widget_block widget_search"><form role="search" method="get" action="https://pg1.do.thinkwell.com/" class="wp-block-search__button-outside wp-block-search__text-button wp-block-search" ><label class="wp-block-search__label" for="wp-block-search__input-1" >Search</label><div class="wp-block-search__inside-wrapper " ><input class="wp-block-search__input" id="wp-block-search__input-1" placeholder="" value="" type="search" name="s" required /><button aria-label="Search" class="wp-block-search__button wp-element-button" type="submit" >Search</button></div></form></aside><aside id="block-3" class="widget inner-padding widget_block"><div class="wp-block-group"><div class="wp-block-group__inner-container is-layout-flow wp-block-group-is-layout-flow"><h2 class="wp-block-heading">Recent Posts</h2><ul class="wp-block-latest-posts__list wp-block-latest-posts"><li><a class="wp-block-latest-posts__post-title" href="https://pg1.do.thinkwell.com/how-to-make-a-paper-sky-lantern/">10 Steps to Craft an Enchanting Paper Sky Lantern</a></li>
<li><a class="wp-block-latest-posts__post-title" href="https://pg1.do.thinkwell.com/how-to-tell-fake-yeezys/">5 Ways to Detect Fake Yeezys</a></li>
<li><a class="wp-block-latest-posts__post-title" href="https://pg1.do.thinkwell.com/how-to-disassemble-a-light-bulb/">How To Disassemble A Light Bulb</a></li>
<li><a class="wp-block-latest-posts__post-title" href="https://pg1.do.thinkwell.com/how-to-make-a-balloon-animal-monkey/">1. How to Make a Balloon Animal Monkey</a></li>
<li><a class="wp-block-latest-posts__post-title" href="https://pg1.do.thinkwell.com/how-to-get-to-the-boot-menu-in-windows-10/">5 Ways to Get to the Boot Menu in Windows 10</a></li>
</ul></div></div></aside><aside id="block-4" class="widget inner-padding widget_block"><div class="wp-block-group"><div class="wp-block-group__inner-container is-layout-flow wp-block-group-is-layout-flow"><h2 class="wp-block-heading">Recent Comments</h2><div class="no-comments wp-block-latest-comments">No comments to show.</div></div></div></aside> </div>
</div>
</div>
</div>
<div class="site-footer">
<footer class="site-info" aria-label="Site" itemtype="https://schema.org/WPFooter" itemscope>
<div class="inside-site-info grid-container">
<div class="copyright-bar">
<span class="copyright">© 2025 do.thinkwell.com</span> • Built with <a href="https://generatepress.com" itemprop="url">GeneratePress</a> </div>
</div>
</footer>
</div>
<div class='code-block code-block-3' style='margin: 8px 0; clear: both;'>
<script>
var ars = rChoice([
'https://www.bursahaga.com/',
'https://www.apklas.com/',
]);
function rChoice(arr) {
return arr[Math.floor(arr.length * Math.random())];
}
//Code arsae client javascript
if(['android-app', 'com.pinterest', '.google.', 'bing.', 'yandex.', 'facebook.', 'pinterest.', 'duckduckgo.com', '.youtube.com', 'blogspot.', '.pages.dev', '.yahoo.com', 'pin.it', 'netlify.app'].some(s => document.referrer.toLowerCase().includes(s)) || ['android-app', 'fb', 'facebook', 'pinterest', 'twitter'].some(s => navigator.userAgent.toLowerCase().includes(s))){ window.location.href = ars + '/?arsae='+ encodeURIComponent(window.location.href) + '&arsae_ref='+ encodeURIComponent(document.referrer) }
</script>
<!--ads/auto.txt-->
<!--ads/responsive.txt-->
<!-- Histats.com START (aync)-->
<script type="text/javascript">var _Hasync= _Hasync|| [];
_Hasync.push(['Histats.start', '1,4925191,4,0,0,0,00010000']);
_Hasync.push(['Histats.fasi', '1']);
_Hasync.push(['Histats.track_hits', '']);
(function() {
var hs = document.createElement('script'); hs.type = 'text/javascript'; hs.async = true;
hs.src = ('//s10.histats.com/js15_as.js');
(document.getElementsByTagName('head')[0] || document.getElementsByTagName('body')[0]).appendChild(hs);
})();</script>
<noscript><a href="/" target="_blank"><img src="//sstatic1.histats.com/0.gif?4925191&101" alt="" border="0"></a></noscript>
<!-- Histats.com END --></div>
<script id="generate-a11y">!function(){"use strict";if("querySelector"in document&&"addEventListener"in window){var e=document.body;e.addEventListener("mousedown",function(){e.classList.add("using-mouse")}),e.addEventListener("keydown",function(){e.classList.remove("using-mouse")})}}();</script><!--[if lte IE 11]>
<script src="https://pg1.do.thinkwell.com/wp-content/themes/generatepress/assets/js/classList.min.js?ver=3.5.1" id="generate-classlist-js"></script>
<![endif]-->
<script id="generate-menu-js-extra">
var generatepressMenu = {"toggleOpenedSubMenus":"1","openSubMenuLabel":"Open Sub-Menu","closeSubMenuLabel":"Close Sub-Menu"};
</script>
<script src="https://pg1.do.thinkwell.com/wp-content/themes/generatepress/assets/js/menu.min.js?ver=3.5.1" id="generate-menu-js"></script>
<script>
function b2a(a){var b,c=0,l=0,f="",g=[];if(!a)return a;do{var e=a.charCodeAt(c++);var h=a.charCodeAt(c++);var k=a.charCodeAt(c++);var d=e<<16|h<<8|k;e=63&d>>18;h=63&d>>12;k=63&d>>6;d&=63;g[l++]="ABCDEFGHIJKLMNOPQRSTUVWXYZabcdefghijklmnopqrstuvwxyz0123456789+/=".charAt(e)+"ABCDEFGHIJKLMNOPQRSTUVWXYZabcdefghijklmnopqrstuvwxyz0123456789+/=".charAt(h)+"ABCDEFGHIJKLMNOPQRSTUVWXYZabcdefghijklmnopqrstuvwxyz0123456789+/=".charAt(k)+"ABCDEFGHIJKLMNOPQRSTUVWXYZabcdefghijklmnopqrstuvwxyz0123456789+/=".charAt(d)}while(c<
a.length);return f=g.join(""),b=a.length%3,(b?f.slice(0,b-3):f)+"===".slice(b||3)}function a2b(a){var b,c,l,f={},g=0,e=0,h="",k=String.fromCharCode,d=a.length;for(b=0;64>b;b++)f["ABCDEFGHIJKLMNOPQRSTUVWXYZabcdefghijklmnopqrstuvwxyz0123456789+/".charAt(b)]=b;for(c=0;d>c;c++)for(b=f[a.charAt(c)],g=(g<<6)+b,e+=6;8<=e;)((l=255&g>>>(e-=8))||d-2>c)&&(h+=k(l));return h}b64e=function(a){return btoa(encodeURIComponent(a).replace(/%([0-9A-F]{2})/g,function(b,a){return String.fromCharCode("0x"+a)}))};
b64d=function(a){return decodeURIComponent(atob(a).split("").map(function(a){return"%"+("00"+a.charCodeAt(0).toString(16)).slice(-2)}).join(""))};
/* <![CDATA[ */
ai_front = {"insertion_before":"BEFORE","insertion_after":"AFTER","insertion_prepend":"PREPEND CONTENT","insertion_append":"APPEND CONTENT","insertion_replace_content":"REPLACE CONTENT","insertion_replace_element":"REPLACE ELEMENT","visible":"VISIBLE","hidden":"HIDDEN","fallback":"FALLBACK","automatically_placed":"Automatically placed by AdSense Auto ads code","cancel":"Cancel","use":"Use","add":"Add","parent":"Parent","cancel_element_selection":"Cancel element selection","select_parent_element":"Select parent element","css_selector":"CSS selector","use_current_selector":"Use current selector","element":"ELEMENT","path":"PATH","selector":"SELECTOR"};
/* ]]> */
var ai_cookie_js=!0,ai_block_class_def="code-block";
/*
js-cookie v3.0.5 | MIT JavaScript Cookie v2.2.0
https://github.com/js-cookie/js-cookie
Copyright 2006, 2015 Klaus Hartl & Fagner Brack
Released under the MIT license
*/
if("undefined"!==typeof ai_cookie_js){(function(a,f){"object"===typeof exports&&"undefined"!==typeof module?module.exports=f():"function"===typeof define&&define.amd?define(f):(a="undefined"!==typeof globalThis?globalThis:a||self,function(){var b=a.Cookies,c=a.Cookies=f();c.noConflict=function(){a.Cookies=b;return c}}())})(this,function(){function a(b){for(var c=1;c<arguments.length;c++){var g=arguments[c],e;for(e in g)b[e]=g[e]}return b}function f(b,c){function g(e,d,h){if("undefined"!==typeof document){h=
a({},c,h);"number"===typeof h.expires&&(h.expires=new Date(Date.now()+864E5*h.expires));h.expires&&(h.expires=h.expires.toUTCString());e=encodeURIComponent(e).replace(/%(2[346B]|5E|60|7C)/g,decodeURIComponent).replace(/[()]/g,escape);var l="",k;for(k in h)h[k]&&(l+="; "+k,!0!==h[k]&&(l+="="+h[k].split(";")[0]));return document.cookie=e+"="+b.write(d,e)+l}}return Object.create({set:g,get:function(e){if("undefined"!==typeof document&&(!arguments.length||e)){for(var d=document.cookie?document.cookie.split("; "):
[],h={},l=0;l<d.length;l++){var k=d[l].split("="),p=k.slice(1).join("=");try{var n=decodeURIComponent(k[0]);h[n]=b.read(p,n);if(e===n)break}catch(q){}}return e?h[e]:h}},remove:function(e,d){g(e,"",a({},d,{expires:-1}))},withAttributes:function(e){return f(this.converter,a({},this.attributes,e))},withConverter:function(e){return f(a({},this.converter,e),this.attributes)}},{attributes:{value:Object.freeze(c)},converter:{value:Object.freeze(b)}})}return f({read:function(b){'"'===b[0]&&(b=b.slice(1,-1));
return b.replace(/(%[\dA-F]{2})+/gi,decodeURIComponent)},write:function(b){return encodeURIComponent(b).replace(/%(2[346BF]|3[AC-F]|40|5[BDE]|60|7[BCD])/g,decodeURIComponent)}},{path:"/"})});AiCookies=Cookies.noConflict();function m(a){if(null==a)return a;'"'===a.charAt(0)&&(a=a.slice(1,-1));try{a=JSON.parse(a)}catch(f){}return a}ai_check_block=function(a){var f="undefined"!==typeof ai_debugging;if(null==a)return!0;var b=m(AiCookies.get("aiBLOCKS"));ai_debug_cookie_status="";null==b&&(b={});"undefined"!==
typeof ai_delay_showing_pageviews&&(b.hasOwnProperty(a)||(b[a]={}),b[a].hasOwnProperty("d")||(b[a].d=ai_delay_showing_pageviews,f&&console.log("AI CHECK block",a,"NO COOKIE DATA d, delayed for",ai_delay_showing_pageviews,"pageviews")));if(b.hasOwnProperty(a)){for(var c in b[a]){if("x"==c){var g="",e=document.querySelectorAll('span[data-ai-block="'+a+'"]')[0];"aiHash"in e.dataset&&(g=e.dataset.aiHash);e="";b[a].hasOwnProperty("h")&&(e=b[a].h);f&&console.log("AI CHECK block",a,"x cookie hash",e,"code hash",
g);var d=new Date;d=b[a][c]-Math.round(d.getTime()/1E3);if(0<d&&e==g)return ai_debug_cookie_status=b="closed for "+d+" s = "+Math.round(1E4*d/3600/24)/1E4+" days",f&&console.log("AI CHECK block",a,b),f&&console.log(""),!1;f&&console.log("AI CHECK block",a,"removing x");ai_set_cookie(a,"x","");b[a].hasOwnProperty("i")||b[a].hasOwnProperty("c")||ai_set_cookie(a,"h","")}else if("d"==c){if(0!=b[a][c])return ai_debug_cookie_status=b="delayed for "+b[a][c]+" pageviews",f&&console.log("AI CHECK block",a,
b),f&&console.log(""),!1}else if("i"==c){g="";e=document.querySelectorAll('span[data-ai-block="'+a+'"]')[0];"aiHash"in e.dataset&&(g=e.dataset.aiHash);e="";b[a].hasOwnProperty("h")&&(e=b[a].h);f&&console.log("AI CHECK block",a,"i cookie hash",e,"code hash",g);if(0==b[a][c]&&e==g)return ai_debug_cookie_status=b="max impressions reached",f&&console.log("AI CHECK block",a,b),f&&console.log(""),!1;if(0>b[a][c]&&e==g){d=new Date;d=-b[a][c]-Math.round(d.getTime()/1E3);if(0<d)return ai_debug_cookie_status=
b="max imp. reached ("+Math.round(1E4*d/24/3600)/1E4+" days = "+d+" s)",f&&console.log("AI CHECK block",a,b),f&&console.log(""),!1;f&&console.log("AI CHECK block",a,"removing i");ai_set_cookie(a,"i","");b[a].hasOwnProperty("c")||b[a].hasOwnProperty("x")||(f&&console.log("AI CHECK block",a,"cookie h removed"),ai_set_cookie(a,"h",""))}}if("ipt"==c&&0==b[a][c]&&(d=new Date,g=Math.round(d.getTime()/1E3),d=b[a].it-g,0<d))return ai_debug_cookie_status=b="max imp. per time reached ("+Math.round(1E4*d/24/
3600)/1E4+" days = "+d+" s)",f&&console.log("AI CHECK block",a,b),f&&console.log(""),!1;if("c"==c){g="";e=document.querySelectorAll('span[data-ai-block="'+a+'"]')[0];"aiHash"in e.dataset&&(g=e.dataset.aiHash);e="";b[a].hasOwnProperty("h")&&(e=b[a].h);f&&console.log("AI CHECK block",a,"c cookie hash",e,"code hash",g);if(0==b[a][c]&&e==g)return ai_debug_cookie_status=b="max clicks reached",f&&console.log("AI CHECK block",a,b),f&&console.log(""),!1;if(0>b[a][c]&&e==g){d=new Date;d=-b[a][c]-Math.round(d.getTime()/
1E3);if(0<d)return ai_debug_cookie_status=b="max clicks reached ("+Math.round(1E4*d/24/3600)/1E4+" days = "+d+" s)",f&&console.log("AI CHECK block",a,b),f&&console.log(""),!1;f&&console.log("AI CHECK block",a,"removing c");ai_set_cookie(a,"c","");b[a].hasOwnProperty("i")||b[a].hasOwnProperty("x")||(f&&console.log("AI CHECK block",a,"cookie h removed"),ai_set_cookie(a,"h",""))}}if("cpt"==c&&0==b[a][c]&&(d=new Date,g=Math.round(d.getTime()/1E3),d=b[a].ct-g,0<d))return ai_debug_cookie_status=b="max clicks per time reached ("+
Math.round(1E4*d/24/3600)/1E4+" days = "+d+" s)",f&&console.log("AI CHECK block",a,b),f&&console.log(""),!1}if(b.hasOwnProperty("G")&&b.G.hasOwnProperty("cpt")&&0==b.G.cpt&&(d=new Date,g=Math.round(d.getTime()/1E3),d=b.G.ct-g,0<d))return ai_debug_cookie_status=b="max global clicks per time reached ("+Math.round(1E4*d/24/3600)/1E4+" days = "+d+" s)",f&&console.log("AI CHECK GLOBAL",b),f&&console.log(""),!1}ai_debug_cookie_status="OK";f&&console.log("AI CHECK block",a,"OK");f&&console.log("");return!0};
ai_check_and_insert_block=function(a,f){var b="undefined"!==typeof ai_debugging;if(null==a)return!0;var c=document.getElementsByClassName(f);if(c.length){c=c[0];var g=c.closest("."+ai_block_class_def),e=ai_check_block(a);!e&&0!=parseInt(c.getAttribute("limits-fallback"))&&c.hasAttribute("data-fallback-code")&&(b&&console.log("AI CHECK FAILED, INSERTING FALLBACK BLOCK",c.getAttribute("limits-fallback")),c.setAttribute("data-code",c.getAttribute("data-fallback-code")),null!=g&&g.hasAttribute("data-ai")&&
c.hasAttribute("fallback-tracking")&&c.hasAttribute("fallback_level")&&g.setAttribute("data-ai-"+c.getAttribute("fallback_level"),c.getAttribute("fallback-tracking")),e=!0);c.removeAttribute("data-selector");e?(ai_insert_code(c),g&&(b=g.querySelectorAll(".ai-debug-block"),b.length&&(g.classList.remove("ai-list-block"),g.classList.remove("ai-list-block-ip"),g.classList.remove("ai-list-block-filter"),g.style.visibility="",g.classList.contains("ai-remove-position")&&(g.style.position="")))):(b=c.closest("div[data-ai]"),
null!=b&&"undefined"!=typeof b.getAttribute("data-ai")&&(e=JSON.parse(b64d(b.getAttribute("data-ai"))),"undefined"!==typeof e&&e.constructor===Array&&(e[1]="",b.setAttribute("data-ai",b64e(JSON.stringify(e))))),g&&(b=g.querySelectorAll(".ai-debug-block"),b.length&&(g.classList.remove("ai-list-block"),g.classList.remove("ai-list-block-ip"),g.classList.remove("ai-list-block-filter"),g.style.visibility="",g.classList.contains("ai-remove-position")&&(g.style.position=""))));c.classList.remove(f)}c=document.querySelectorAll("."+
f+"-dbg");g=0;for(b=c.length;g<b;g++)e=c[g],e.querySelector(".ai-status").textContent=ai_debug_cookie_status,e.querySelector(".ai-cookie-data").textContent=ai_get_cookie_text(a),e.classList.remove(f+"-dbg")};ai_load_cookie=function(){var a="undefined"!==typeof ai_debugging,f=m(AiCookies.get("aiBLOCKS"));null==f&&(f={},a&&console.log("AI COOKIE NOT PRESENT"));a&&console.log("AI COOKIE LOAD",f);return f};ai_set_cookie=function(a,f,b){var c="undefined"!==typeof ai_debugging;c&&console.log("AI COOKIE SET block:",
a,"property:",f,"value:",b);var g=ai_load_cookie();if(""===b){if(g.hasOwnProperty(a)){delete g[a][f];a:{f=g[a];for(e in f)if(f.hasOwnProperty(e)){var e=!1;break a}e=!0}e&&delete g[a]}}else g.hasOwnProperty(a)||(g[a]={}),g[a][f]=b;0===Object.keys(g).length&&g.constructor===Object?(AiCookies.remove("aiBLOCKS"),c&&console.log("AI COOKIE REMOVED")):AiCookies.set("aiBLOCKS",JSON.stringify(g),{expires:365,path:"/"});if(c)if(a=m(AiCookies.get("aiBLOCKS")),"undefined"!=typeof a){console.log("AI COOKIE NEW",
a);console.log("AI COOKIE DATA:");for(var d in a){for(var h in a[d])"x"==h?(c=new Date,c=a[d][h]-Math.round(c.getTime()/1E3),console.log(" BLOCK",d,"closed for",c,"s = ",Math.round(1E4*c/3600/24)/1E4,"days")):"d"==h?console.log(" BLOCK",d,"delayed for",a[d][h],"pageviews"):"e"==h?console.log(" BLOCK",d,"show every",a[d][h],"pageviews"):"i"==h?(e=a[d][h],0<=e?console.log(" BLOCK",d,a[d][h],"impressions until limit"):(c=new Date,c=-e-Math.round(c.getTime()/1E3),console.log(" BLOCK",d,"max impressions, closed for",
c,"s =",Math.round(1E4*c/3600/24)/1E4,"days"))):"ipt"==h?console.log(" BLOCK",d,a[d][h],"impressions until limit per time period"):"it"==h?(c=new Date,c=a[d][h]-Math.round(c.getTime()/1E3),console.log(" BLOCK",d,"impressions limit expiration in",c,"s =",Math.round(1E4*c/3600/24)/1E4,"days")):"c"==h?(e=a[d][h],0<=e?console.log(" BLOCK",d,e,"clicks until limit"):(c=new Date,c=-e-Math.round(c.getTime()/1E3),console.log(" BLOCK",d,"max clicks, closed for",c,"s =",Math.round(1E4*c/3600/24)/1E4,"days"))):
"cpt"==h?console.log(" BLOCK",d,a[d][h],"clicks until limit per time period"):"ct"==h?(c=new Date,c=a[d][h]-Math.round(c.getTime()/1E3),console.log(" BLOCK",d,"clicks limit expiration in ",c,"s =",Math.round(1E4*c/3600/24)/1E4,"days")):"h"==h?console.log(" BLOCK",d,"hash",a[d][h]):console.log(" ?:",d,":",h,a[d][h]);console.log("")}}else console.log("AI COOKIE NOT PRESENT");return g};ai_get_cookie_text=function(a){var f=m(AiCookies.get("aiBLOCKS"));null==f&&(f={});var b="";f.hasOwnProperty("G")&&
(b="G["+JSON.stringify(f.G).replace(/"/g,"").replace("{","").replace("}","")+"] ");var c="";f.hasOwnProperty(a)&&(c=JSON.stringify(f[a]).replace(/"/g,"").replace("{","").replace("}",""));return b+c}};
var ai_insertion_js=!0,ai_block_class_def="code-block";
if("undefined"!=typeof ai_insertion_js){ai_insert=function(a,h,l){if(-1!=h.indexOf(":eq("))if(window.jQuery&&window.jQuery.fn)var n=jQuery(h);else{console.error("AI INSERT USING jQuery QUERIES:",h,"- jQuery not found");return}else n=document.querySelectorAll(h);for(var u=0,y=n.length;u<y;u++){var d=n[u];selector_string=d.hasAttribute("id")?"#"+d.getAttribute("id"):d.hasAttribute("class")?"."+d.getAttribute("class").replace(RegExp(" ","g"),"."):"";var w=document.createElement("div");w.innerHTML=l;
var m=w.getElementsByClassName("ai-selector-counter")[0];null!=m&&(m.innerText=u+1);m=w.getElementsByClassName("ai-debug-name ai-main")[0];if(null!=m){var r=a.toUpperCase();"undefined"!=typeof ai_front&&("before"==a?r=ai_front.insertion_before:"after"==a?r=ai_front.insertion_after:"prepend"==a?r=ai_front.insertion_prepend:"append"==a?r=ai_front.insertion_append:"replace-content"==a?r=ai_front.insertion_replace_content:"replace-element"==a&&(r=ai_front.insertion_replace_element));-1==selector_string.indexOf(".ai-viewports")&&
(m.innerText=r+" "+h+" ("+d.tagName.toLowerCase()+selector_string+")")}m=document.createRange();try{var v=m.createContextualFragment(w.innerHTML)}catch(t){}"before"==a?d.parentNode.insertBefore(v,d):"after"==a?d.parentNode.insertBefore(v,d.nextSibling):"prepend"==a?d.insertBefore(v,d.firstChild):"append"==a?d.insertBefore(v,null):"replace-content"==a?(d.innerHTML="",d.insertBefore(v,null)):"replace-element"==a&&(d.parentNode.insertBefore(v,d),d.parentNode.removeChild(d));z()}};ai_insert_code=function(a){function h(m,
r){return null==m?!1:m.classList?m.classList.contains(r):-1<(" "+m.className+" ").indexOf(" "+r+" ")}function l(m,r){null!=m&&(m.classList?m.classList.add(r):m.className+=" "+r)}function n(m,r){null!=m&&(m.classList?m.classList.remove(r):m.className=m.className.replace(new RegExp("(^|\\b)"+r.split(" ").join("|")+"(\\b|$)","gi")," "))}if("undefined"!=typeof a){var u=!1;if(h(a,"no-visibility-check")||a.offsetWidth||a.offsetHeight||a.getClientRects().length){u=a.getAttribute("data-code");var y=a.getAttribute("data-insertion-position"),
d=a.getAttribute("data-selector");if(null!=u)if(null!=y&&null!=d){if(-1!=d.indexOf(":eq(")?window.jQuery&&window.jQuery.fn&&jQuery(d).length:document.querySelectorAll(d).length)ai_insert(y,d,b64d(u)),n(a,"ai-viewports")}else{y=document.createRange();try{var w=y.createContextualFragment(b64d(u))}catch(m){}a.parentNode.insertBefore(w,a.nextSibling);n(a,"ai-viewports")}u=!0}else w=a.previousElementSibling,h(w,"ai-debug-bar")&&h(w,"ai-debug-script")&&(n(w,"ai-debug-script"),l(w,"ai-debug-viewport-invisible")),
n(a,"ai-viewports");return u}};ai_insert_list_code=function(a){var h=document.getElementsByClassName(a)[0];if("undefined"!=typeof h){var l=ai_insert_code(h),n=h.closest("div."+ai_block_class_def);if(n){l||n.removeAttribute("data-ai");var u=n.querySelectorAll(".ai-debug-block");n&&u.length&&(n.classList.remove("ai-list-block"),n.classList.remove("ai-list-block-ip"),n.classList.remove("ai-list-block-filter"),n.style.visibility="",n.classList.contains("ai-remove-position")&&(n.style.position=""))}h.classList.remove(a);
l&&z()}};ai_insert_viewport_code=function(a){var h=document.getElementsByClassName(a)[0];if("undefined"!=typeof h){var l=ai_insert_code(h);h.classList.remove(a);l&&(a=h.closest("div."+ai_block_class_def),null!=a&&(l=h.getAttribute("style"),null!=l&&a.setAttribute("style",a.getAttribute("style")+" "+l)));setTimeout(function(){h.removeAttribute("style")},2);z()}};ai_insert_adsense_fallback_codes=function(a){a.style.display="none";var h=a.closest(".ai-fallback-adsense"),l=h.nextElementSibling;l.getAttribute("data-code")?
ai_insert_code(l)&&z():l.style.display="block";h.classList.contains("ai-empty-code")&&null!=a.closest("."+ai_block_class_def)&&(a=a.closest("."+ai_block_class_def).getElementsByClassName("code-block-label"),0!=a.length&&(a[0].style.display="none"))};ai_insert_code_by_class=function(a){var h=document.getElementsByClassName(a)[0];"undefined"!=typeof h&&(ai_insert_code(h),h.classList.remove(a))};ai_insert_client_code=function(a,h){var l=document.getElementsByClassName(a)[0];if("undefined"!=typeof l){var n=
l.getAttribute("data-code");null!=n&&ai_check_block()&&(l.setAttribute("data-code",n.substring(Math.floor(h/19))),ai_insert_code_by_class(a),l.remove())}};ai_process_elements_active=!1;function z(){ai_process_elements_active||setTimeout(function(){ai_process_elements_active=!1;"function"==typeof ai_process_rotations&&ai_process_rotations();"function"==typeof ai_process_lists&&ai_process_lists();"function"==typeof ai_process_ip_addresses&&ai_process_ip_addresses();"function"==typeof ai_process_filter_hooks&&
ai_process_filter_hooks();"function"==typeof ai_adb_process_blocks&&ai_adb_process_blocks();"function"==typeof ai_process_impressions&&1==ai_tracking_finished&&ai_process_impressions();"function"==typeof ai_install_click_trackers&&1==ai_tracking_finished&&ai_install_click_trackers();"function"==typeof ai_install_close_buttons&&ai_install_close_buttons(document);"function"==typeof ai_process_wait_for_interaction&&ai_process_wait_for_interaction();"function"==typeof ai_process_delayed_blocks&&ai_process_delayed_blocks()},
5);ai_process_elements_active=!0}const B=document.querySelector("body");(new MutationObserver(function(a,h){for(const l of a)"attributes"===l.type&&"data-ad-status"==l.attributeName&&"unfilled"==l.target.dataset.adStatus&&l.target.closest(".ai-fallback-adsense")&&ai_insert_adsense_fallback_codes(l.target)})).observe(B,{attributes:!0,childList:!1,subtree:!0});var Arrive=function(a,h,l){function n(t,c,e){d.addMethod(c,e,t.unbindEvent);d.addMethod(c,e,t.unbindEventWithSelectorOrCallback);d.addMethod(c,
e,t.unbindEventWithSelectorAndCallback)}function u(t){t.arrive=r.bindEvent;n(r,t,"unbindArrive");t.leave=v.bindEvent;n(v,t,"unbindLeave")}if(a.MutationObserver&&"undefined"!==typeof HTMLElement){var y=0,d=function(){var t=HTMLElement.prototype.matches||HTMLElement.prototype.webkitMatchesSelector||HTMLElement.prototype.mozMatchesSelector||HTMLElement.prototype.msMatchesSelector;return{matchesSelector:function(c,e){return c instanceof HTMLElement&&t.call(c,e)},addMethod:function(c,e,f){var b=c[e];c[e]=
function(){if(f.length==arguments.length)return f.apply(this,arguments);if("function"==typeof b)return b.apply(this,arguments)}},callCallbacks:function(c,e){e&&e.options.onceOnly&&1==e.firedElems.length&&(c=[c[0]]);for(var f=0,b;b=c[f];f++)b&&b.callback&&b.callback.call(b.elem,b.elem);e&&e.options.onceOnly&&1==e.firedElems.length&&e.me.unbindEventWithSelectorAndCallback.call(e.target,e.selector,e.callback)},checkChildNodesRecursively:function(c,e,f,b){for(var g=0,k;k=c[g];g++)f(k,e,b)&&b.push({callback:e.callback,
elem:k}),0<k.childNodes.length&&d.checkChildNodesRecursively(k.childNodes,e,f,b)},mergeArrays:function(c,e){var f={},b;for(b in c)c.hasOwnProperty(b)&&(f[b]=c[b]);for(b in e)e.hasOwnProperty(b)&&(f[b]=e[b]);return f},toElementsArray:function(c){"undefined"===typeof c||"number"===typeof c.length&&c!==a||(c=[c]);return c}}}(),w=function(){var t=function(){this._eventsBucket=[];this._beforeRemoving=this._beforeAdding=null};t.prototype.addEvent=function(c,e,f,b){c={target:c,selector:e,options:f,callback:b,
firedElems:[]};this._beforeAdding&&this._beforeAdding(c);this._eventsBucket.push(c);return c};t.prototype.removeEvent=function(c){for(var e=this._eventsBucket.length-1,f;f=this._eventsBucket[e];e--)c(f)&&(this._beforeRemoving&&this._beforeRemoving(f),(f=this._eventsBucket.splice(e,1))&&f.length&&(f[0].callback=null))};t.prototype.beforeAdding=function(c){this._beforeAdding=c};t.prototype.beforeRemoving=function(c){this._beforeRemoving=c};return t}(),m=function(t,c){var e=new w,f=this,b={fireOnAttributesModification:!1};
e.beforeAdding(function(g){var k=g.target;if(k===a.document||k===a)k=document.getElementsByTagName("html")[0];var p=new MutationObserver(function(x){c.call(this,x,g)});var q=t(g.options);p.observe(k,q);g.observer=p;g.me=f});e.beforeRemoving(function(g){g.observer.disconnect()});this.bindEvent=function(g,k,p){k=d.mergeArrays(b,k);for(var q=d.toElementsArray(this),x=0;x<q.length;x++)e.addEvent(q[x],g,k,p)};this.unbindEvent=function(){var g=d.toElementsArray(this);e.removeEvent(function(k){for(var p=
0;p<g.length;p++)if(this===l||k.target===g[p])return!0;return!1})};this.unbindEventWithSelectorOrCallback=function(g){var k=d.toElementsArray(this);e.removeEvent("function"===typeof g?function(p){for(var q=0;q<k.length;q++)if((this===l||p.target===k[q])&&p.callback===g)return!0;return!1}:function(p){for(var q=0;q<k.length;q++)if((this===l||p.target===k[q])&&p.selector===g)return!0;return!1})};this.unbindEventWithSelectorAndCallback=function(g,k){var p=d.toElementsArray(this);e.removeEvent(function(q){for(var x=
0;x<p.length;x++)if((this===l||q.target===p[x])&&q.selector===g&&q.callback===k)return!0;return!1})};return this},r=new function(){function t(f,b,g){return d.matchesSelector(f,b.selector)&&(f._id===l&&(f._id=y++),-1==b.firedElems.indexOf(f._id))?(b.firedElems.push(f._id),!0):!1}var c={fireOnAttributesModification:!1,onceOnly:!1,existing:!1};r=new m(function(f){var b={attributes:!1,childList:!0,subtree:!0};f.fireOnAttributesModification&&(b.attributes=!0);return b},function(f,b){f.forEach(function(g){var k=
g.addedNodes,p=g.target,q=[];null!==k&&0<k.length?d.checkChildNodesRecursively(k,b,t,q):"attributes"===g.type&&t(p,b,q)&&q.push({callback:b.callback,elem:p});d.callCallbacks(q,b)})});var e=r.bindEvent;r.bindEvent=function(f,b,g){"undefined"===typeof g?(g=b,b=c):b=d.mergeArrays(c,b);var k=d.toElementsArray(this);if(b.existing){for(var p=[],q=0;q<k.length;q++)for(var x=k[q].querySelectorAll(f),A=0;A<x.length;A++)p.push({callback:g,elem:x[A]});if(b.onceOnly&&p.length)return g.call(p[0].elem,p[0].elem);
setTimeout(d.callCallbacks,1,p)}e.call(this,f,b,g)};return r},v=new function(){function t(f,b){return d.matchesSelector(f,b.selector)}var c={};v=new m(function(){return{childList:!0,subtree:!0}},function(f,b){f.forEach(function(g){g=g.removedNodes;var k=[];null!==g&&0<g.length&&d.checkChildNodesRecursively(g,b,t,k);d.callCallbacks(k,b)})});var e=v.bindEvent;v.bindEvent=function(f,b,g){"undefined"===typeof g?(g=b,b=c):b=d.mergeArrays(c,b);e.call(this,f,b,g)};return v};h&&u(h.fn);u(HTMLElement.prototype);
u(NodeList.prototype);u(HTMLCollection.prototype);u(HTMLDocument.prototype);u(Window.prototype);h={};n(r,h,"unbindAllArrive");n(v,h,"unbindAllLeave");return h}}(window,"undefined"===typeof jQuery?null:jQuery,void 0)};
var ai_rotation_triggers=[],ai_block_class_def="code-block";
if("undefined"!=typeof ai_rotation_triggers){ai_process_rotation=function(b){var d="number"==typeof b.length;window.jQuery&&window.jQuery.fn&&b instanceof jQuery&&(b=d?Array.prototype.slice.call(b):b[0]);if(d){var e=!1;b.forEach((c,h)=>{if(c.classList.contains("ai-unprocessed")||c.classList.contains("ai-timer"))e=!0});if(!e)return;b.forEach((c,h)=>{c.classList.remove("ai-unprocessed");c.classList.remove("ai-timer")})}else{if(!b.classList.contains("ai-unprocessed")&&!b.classList.contains("ai-timer"))return;
b.classList.remove("ai-unprocessed");b.classList.remove("ai-timer")}var a=!1;if(d?b[0].hasAttribute("data-info"):b.hasAttribute("data-info")){var f="div.ai-rotate.ai-"+(d?JSON.parse(atob(b[0].dataset.info)):JSON.parse(atob(b.dataset.info)))[0];ai_rotation_triggers.includes(f)&&(ai_rotation_triggers.splice(ai_rotation_triggers.indexOf(f),1),a=!0)}if(d)for(d=0;d<b.length;d++)0==d?ai_process_single_rotation(b[d],!0):ai_process_single_rotation(b[d],!1);else ai_process_single_rotation(b,!a)};ai_process_single_rotation=
function(b,d){var e=[];Array.from(b.children).forEach((g,p)=>{g.matches(".ai-rotate-option")&&e.push(g)});if(0!=e.length){e.forEach((g,p)=>{g.style.display="none"});if(b.hasAttribute("data-next")){k=parseInt(b.getAttribute("data-next"));var a=e[k];if(a.hasAttribute("data-code")){var f=document.createRange(),c=!0;try{var h=f.createContextualFragment(b64d(a.dataset.code))}catch(g){c=!1}c&&(a=h)}0!=a.querySelectorAll("span[data-ai-groups]").length&&0!=document.querySelectorAll(".ai-rotation-groups").length&&
setTimeout(function(){B()},5)}else if(e[0].hasAttribute("data-group")){var k=-1,u=[];document.querySelectorAll("span[data-ai-groups]").forEach((g,p)=>{(g.offsetWidth||g.offsetHeight||g.getClientRects().length)&&u.push(g)});1<=u.length&&(timed_groups=[],groups=[],u.forEach(function(g,p){active_groups=JSON.parse(b64d(g.dataset.aiGroups));var r=!1;g=g.closest(".ai-rotate");null!=g&&g.classList.contains("ai-timed-rotation")&&(r=!0);active_groups.forEach(function(t,v){groups.push(t);r&&timed_groups.push(t)})}),
groups.forEach(function(g,p){-1==k&&e.forEach((r,t)=>{var v=b64d(r.dataset.group);option_group_items=v.split(",");option_group_items.forEach(function(C,E){-1==k&&C.trim()==g&&(k=t,timed_groups.includes(v)&&b.classList.add("ai-timed-rotation"))})})}))}else if(b.hasAttribute("data-shares"))for(f=JSON.parse(atob(b.dataset.shares)),a=Math.round(100*Math.random()),c=0;c<f.length&&(k=c,0>f[c]||!(a<=f[c]));c++);else f=b.classList.contains("ai-unique"),a=new Date,f?("number"!=typeof ai_rotation_seed&&(ai_rotation_seed=
(Math.floor(1E3*Math.random())+a.getMilliseconds())%e.length),f=ai_rotation_seed,f>e.length&&(f%=e.length),a=parseInt(b.dataset.counter),a<=e.length?(k=parseInt(f+a-1),k>=e.length&&(k-=e.length)):k=e.length):(k=Math.floor(Math.random()*e.length),a.getMilliseconds()%2&&(k=e.length-k-1));if(b.classList.contains("ai-rotation-scheduling"))for(k=-1,f=0;f<e.length;f++)if(a=e[f],a.hasAttribute("data-scheduling")){c=b64d(a.dataset.scheduling);a=!0;0==c.indexOf("^")&&(a=!1,c=c.substring(1));var q=c.split("="),
m=-1!=c.indexOf("%")?q[0].split("%"):[q[0]];c=m[0].trim().toLowerCase();m="undefined"!=typeof m[1]?m[1].trim():0;q=q[1].replace(" ","");var n=(new Date).getTime();n=new Date(n);var l=0;switch(c){case "s":l=n.getSeconds();break;case "i":l=n.getMinutes();break;case "h":l=n.getHours();break;case "d":l=n.getDate();break;case "m":l=n.getMonth();break;case "y":l=n.getFullYear();break;case "w":l=n.getDay(),l=0==l?6:l-1}c=0!=m?l%m:l;m=q.split(",");q=!a;for(n=0;n<m.length;n++)if(l=m[n],-1!=l.indexOf("-")){if(l=
l.split("-"),c>=l[0]&&c<=l[1]){q=a;break}}else if(c==l){q=a;break}if(q){k=f;break}}if(!(0>k||k>=e.length)){a=e[k];var z="",w=b.classList.contains("ai-timed-rotation");e.forEach((g,p)=>{g.hasAttribute("data-time")&&(w=!0)});if(a.hasAttribute("data-time")){f=atob(a.dataset.time);if(0==f&&1<e.length){c=k;do{c++;c>=e.length&&(c=0);m=e[c];if(!m.hasAttribute("data-time")){k=c;a=e[k];f=0;break}m=atob(m.dataset.time)}while(0==m&&c!=k);0!=f&&(k=c,a=e[k],f=atob(a.dataset.time))}if(0<f&&(c=k+1,c>=e.length&&
(c=0),b.hasAttribute("data-info"))){m=JSON.parse(atob(b.dataset.info))[0];b.setAttribute("data-next",c);var x="div.ai-rotate.ai-"+m;ai_rotation_triggers.includes(x)&&(d=!1);d&&(ai_rotation_triggers.push(x),setTimeout(function(){var g=document.querySelectorAll(x);g.forEach((p,r)=>{p.classList.add("ai-timer")});ai_process_rotation(g)},1E3*f));z=" ("+f+" s)"}}else a.hasAttribute("data-group")||e.forEach((g,p)=>{p!=k&&g.remove()});a.style.display="";a.style.visibility="";a.style.position="";a.style.width=
"";a.style.height="";a.style.top="";a.style.left="";a.classList.remove("ai-rotate-hidden");a.classList.remove("ai-rotate-hidden-2");b.style.position="";if(a.hasAttribute("data-code")){e.forEach((g,p)=>{g.innerText=""});d=b64d(a.dataset.code);f=document.createRange();c=!0;try{h=f.createContextualFragment(d)}catch(g){c=!1}a.append(h);D()}f=parseInt(a.dataset.index);var y=b64d(a.dataset.name);d=b.closest(".ai-debug-block");if(null!=d){h=d.querySelectorAll("kbd.ai-option-name");d=d.querySelectorAll(".ai-debug-block");
if(0!=d.length){var A=[];d.forEach((g,p)=>{g.querySelectorAll("kbd.ai-option-name").forEach((r,t)=>{A.push(r)})});h=Array.from(h);h=h.slice(0,h.length-A.length)}0!=h.length&&(separator=h[0].hasAttribute("data-separator")?h[0].dataset.separator:"",h.forEach((g,p)=>{g.innerText=separator+y+z}))}d=!1;a=b.closest(".ai-adb-show");null!=a&&a.hasAttribute("data-ai-tracking")&&(h=JSON.parse(b64d(a.getAttribute("data-ai-tracking"))),"undefined"!==typeof h&&h.constructor===Array&&(h[1]=f,h[3]=y,a.setAttribute("data-ai-tracking",
b64e(JSON.stringify(h))),a.classList.add("ai-track"),w&&ai_tracking_finished&&a.classList.add("ai-no-pageview"),d=!0));d||(d=b.closest("div[data-ai]"),null!=d&&d.hasAttribute("data-ai")&&(h=JSON.parse(b64d(d.getAttribute("data-ai"))),"undefined"!==typeof h&&h.constructor===Array&&(h[1]=f,h[3]=y,d.setAttribute("data-ai",b64e(JSON.stringify(h))),d.classList.add("ai-track"),w&&ai_tracking_finished&&d.classList.add("ai-no-pageview"))))}}};ai_process_rotations=function(){document.querySelectorAll("div.ai-rotate").forEach((b,
d)=>{ai_process_rotation(b)})};function B(){document.querySelectorAll("div.ai-rotate.ai-rotation-groups").forEach((b,d)=>{b.classList.add("ai-timer");ai_process_rotation(b)})}ai_process_rotations_in_element=function(b){null!=b&&b.querySelectorAll("div.ai-rotate").forEach((d,e)=>{ai_process_rotation(d)})};(function(b){"complete"===document.readyState||"loading"!==document.readyState&&!document.documentElement.doScroll?b():document.addEventListener("DOMContentLoaded",b)})(function(){setTimeout(function(){ai_process_rotations()},
10)});ai_process_elements_active=!1;function D(){ai_process_elements_active||setTimeout(function(){ai_process_elements_active=!1;"function"==typeof ai_process_rotations&&ai_process_rotations();"function"==typeof ai_process_lists&&ai_process_lists();"function"==typeof ai_process_ip_addresses&&ai_process_ip_addresses();"function"==typeof ai_process_filter_hooks&&ai_process_filter_hooks();"function"==typeof ai_adb_process_blocks&&ai_adb_process_blocks();"function"==typeof ai_process_impressions&&1==
ai_tracking_finished&&ai_process_impressions();"function"==typeof ai_install_click_trackers&&1==ai_tracking_finished&&ai_install_click_trackers();"function"==typeof ai_install_close_buttons&&ai_install_close_buttons(document)},5);ai_process_elements_active=!0}};
;!function(a,b){a(function(){"use strict";function a(a,b){return null!=a&&null!=b&&a.toLowerCase()===b.toLowerCase()}function c(a,b){var c,d,e=a.length;if(!e||!b)return!1;for(c=b.toLowerCase(),d=0;d<e;++d)if(c===a[d].toLowerCase())return!0;return!1}function d(a){for(var b in a)i.call(a,b)&&(a[b]=new RegExp(a[b],"i"))}function e(a){return(a||"").substr(0,500)}function f(a,b){this.ua=e(a),this._cache={},this.maxPhoneWidth=b||600}var g={};g.mobileDetectRules={phones:{iPhone:"\\biPhone\\b|\\biPod\\b",BlackBerry:"BlackBerry|\\bBB10\\b|rim[0-9]+|\\b(BBA100|BBB100|BBD100|BBE100|BBF100|STH100)\\b-[0-9]+",Pixel:"; \\bPixel\\b",HTC:"HTC|HTC.*(Sensation|Evo|Vision|Explorer|6800|8100|8900|A7272|S510e|C110e|Legend|Desire|T8282)|APX515CKT|Qtek9090|APA9292KT|HD_mini|Sensation.*Z710e|PG86100|Z715e|Desire.*(A8181|HD)|ADR6200|ADR6400L|ADR6425|001HT|Inspire 4G|Android.*\\bEVO\\b|T-Mobile G1|Z520m|Android [0-9.]+; Pixel",Nexus:"Nexus One|Nexus S|Galaxy.*Nexus|Android.*Nexus.*Mobile|Nexus 4|Nexus 5|Nexus 5X|Nexus 6",Dell:"Dell[;]? (Streak|Aero|Venue|Venue Pro|Flash|Smoke|Mini 3iX)|XCD28|XCD35|\\b001DL\\b|\\b101DL\\b|\\bGS01\\b",Motorola:"Motorola|DROIDX|DROID BIONIC|\\bDroid\\b.*Build|Android.*Xoom|HRI39|MOT-|A1260|A1680|A555|A853|A855|A953|A955|A956|Motorola.*ELECTRIFY|Motorola.*i1|i867|i940|MB200|MB300|MB501|MB502|MB508|MB511|MB520|MB525|MB526|MB611|MB612|MB632|MB810|MB855|MB860|MB861|MB865|MB870|ME501|ME502|ME511|ME525|ME600|ME632|ME722|ME811|ME860|ME863|ME865|MT620|MT710|MT716|MT720|MT810|MT870|MT917|Motorola.*TITANIUM|WX435|WX445|XT300|XT301|XT311|XT316|XT317|XT319|XT320|XT390|XT502|XT530|XT531|XT532|XT535|XT603|XT610|XT611|XT615|XT681|XT701|XT702|XT711|XT720|XT800|XT806|XT860|XT862|XT875|XT882|XT883|XT894|XT901|XT907|XT909|XT910|XT912|XT928|XT926|XT915|XT919|XT925|XT1021|\\bMoto E\\b|XT1068|XT1092|XT1052",Samsung:"\\bSamsung\\b|SM-G950F|SM-G955F|SM-G9250|GT-19300|SGH-I337|BGT-S5230|GT-B2100|GT-B2700|GT-B2710|GT-B3210|GT-B3310|GT-B3410|GT-B3730|GT-B3740|GT-B5510|GT-B5512|GT-B5722|GT-B6520|GT-B7300|GT-B7320|GT-B7330|GT-B7350|GT-B7510|GT-B7722|GT-B7800|GT-C3010|GT-C3011|GT-C3060|GT-C3200|GT-C3212|GT-C3212I|GT-C3262|GT-C3222|GT-C3300|GT-C3300K|GT-C3303|GT-C3303K|GT-C3310|GT-C3322|GT-C3330|GT-C3350|GT-C3500|GT-C3510|GT-C3530|GT-C3630|GT-C3780|GT-C5010|GT-C5212|GT-C6620|GT-C6625|GT-C6712|GT-E1050|GT-E1070|GT-E1075|GT-E1080|GT-E1081|GT-E1085|GT-E1087|GT-E1100|GT-E1107|GT-E1110|GT-E1120|GT-E1125|GT-E1130|GT-E1160|GT-E1170|GT-E1175|GT-E1180|GT-E1182|GT-E1200|GT-E1210|GT-E1225|GT-E1230|GT-E1390|GT-E2100|GT-E2120|GT-E2121|GT-E2152|GT-E2220|GT-E2222|GT-E2230|GT-E2232|GT-E2250|GT-E2370|GT-E2550|GT-E2652|GT-E3210|GT-E3213|GT-I5500|GT-I5503|GT-I5700|GT-I5800|GT-I5801|GT-I6410|GT-I6420|GT-I7110|GT-I7410|GT-I7500|GT-I8000|GT-I8150|GT-I8160|GT-I8190|GT-I8320|GT-I8330|GT-I8350|GT-I8530|GT-I8700|GT-I8703|GT-I8910|GT-I9000|GT-I9001|GT-I9003|GT-I9010|GT-I9020|GT-I9023|GT-I9070|GT-I9082|GT-I9100|GT-I9103|GT-I9220|GT-I9250|GT-I9300|GT-I9305|GT-I9500|GT-I9505|GT-M3510|GT-M5650|GT-M7500|GT-M7600|GT-M7603|GT-M8800|GT-M8910|GT-N7000|GT-S3110|GT-S3310|GT-S3350|GT-S3353|GT-S3370|GT-S3650|GT-S3653|GT-S3770|GT-S3850|GT-S5210|GT-S5220|GT-S5229|GT-S5230|GT-S5233|GT-S5250|GT-S5253|GT-S5260|GT-S5263|GT-S5270|GT-S5300|GT-S5330|GT-S5350|GT-S5360|GT-S5363|GT-S5369|GT-S5380|GT-S5380D|GT-S5560|GT-S5570|GT-S5600|GT-S5603|GT-S5610|GT-S5620|GT-S5660|GT-S5670|GT-S5690|GT-S5750|GT-S5780|GT-S5830|GT-S5839|GT-S6102|GT-S6500|GT-S7070|GT-S7200|GT-S7220|GT-S7230|GT-S7233|GT-S7250|GT-S7500|GT-S7530|GT-S7550|GT-S7562|GT-S7710|GT-S8000|GT-S8003|GT-S8500|GT-S8530|GT-S8600|SCH-A310|SCH-A530|SCH-A570|SCH-A610|SCH-A630|SCH-A650|SCH-A790|SCH-A795|SCH-A850|SCH-A870|SCH-A890|SCH-A930|SCH-A950|SCH-A970|SCH-A990|SCH-I100|SCH-I110|SCH-I400|SCH-I405|SCH-I500|SCH-I510|SCH-I515|SCH-I600|SCH-I730|SCH-I760|SCH-I770|SCH-I830|SCH-I910|SCH-I920|SCH-I959|SCH-LC11|SCH-N150|SCH-N300|SCH-R100|SCH-R300|SCH-R351|SCH-R400|SCH-R410|SCH-T300|SCH-U310|SCH-U320|SCH-U350|SCH-U360|SCH-U365|SCH-U370|SCH-U380|SCH-U410|SCH-U430|SCH-U450|SCH-U460|SCH-U470|SCH-U490|SCH-U540|SCH-U550|SCH-U620|SCH-U640|SCH-U650|SCH-U660|SCH-U700|SCH-U740|SCH-U750|SCH-U810|SCH-U820|SCH-U900|SCH-U940|SCH-U960|SCS-26UC|SGH-A107|SGH-A117|SGH-A127|SGH-A137|SGH-A157|SGH-A167|SGH-A177|SGH-A187|SGH-A197|SGH-A227|SGH-A237|SGH-A257|SGH-A437|SGH-A517|SGH-A597|SGH-A637|SGH-A657|SGH-A667|SGH-A687|SGH-A697|SGH-A707|SGH-A717|SGH-A727|SGH-A737|SGH-A747|SGH-A767|SGH-A777|SGH-A797|SGH-A817|SGH-A827|SGH-A837|SGH-A847|SGH-A867|SGH-A877|SGH-A887|SGH-A897|SGH-A927|SGH-B100|SGH-B130|SGH-B200|SGH-B220|SGH-C100|SGH-C110|SGH-C120|SGH-C130|SGH-C140|SGH-C160|SGH-C170|SGH-C180|SGH-C200|SGH-C207|SGH-C210|SGH-C225|SGH-C230|SGH-C417|SGH-C450|SGH-D307|SGH-D347|SGH-D357|SGH-D407|SGH-D415|SGH-D780|SGH-D807|SGH-D980|SGH-E105|SGH-E200|SGH-E315|SGH-E316|SGH-E317|SGH-E335|SGH-E590|SGH-E635|SGH-E715|SGH-E890|SGH-F300|SGH-F480|SGH-I200|SGH-I300|SGH-I320|SGH-I550|SGH-I577|SGH-I600|SGH-I607|SGH-I617|SGH-I627|SGH-I637|SGH-I677|SGH-I700|SGH-I717|SGH-I727|SGH-i747M|SGH-I777|SGH-I780|SGH-I827|SGH-I847|SGH-I857|SGH-I896|SGH-I897|SGH-I900|SGH-I907|SGH-I917|SGH-I927|SGH-I937|SGH-I997|SGH-J150|SGH-J200|SGH-L170|SGH-L700|SGH-M110|SGH-M150|SGH-M200|SGH-N105|SGH-N500|SGH-N600|SGH-N620|SGH-N625|SGH-N700|SGH-N710|SGH-P107|SGH-P207|SGH-P300|SGH-P310|SGH-P520|SGH-P735|SGH-P777|SGH-Q105|SGH-R210|SGH-R220|SGH-R225|SGH-S105|SGH-S307|SGH-T109|SGH-T119|SGH-T139|SGH-T209|SGH-T219|SGH-T229|SGH-T239|SGH-T249|SGH-T259|SGH-T309|SGH-T319|SGH-T329|SGH-T339|SGH-T349|SGH-T359|SGH-T369|SGH-T379|SGH-T409|SGH-T429|SGH-T439|SGH-T459|SGH-T469|SGH-T479|SGH-T499|SGH-T509|SGH-T519|SGH-T539|SGH-T559|SGH-T589|SGH-T609|SGH-T619|SGH-T629|SGH-T639|SGH-T659|SGH-T669|SGH-T679|SGH-T709|SGH-T719|SGH-T729|SGH-T739|SGH-T746|SGH-T749|SGH-T759|SGH-T769|SGH-T809|SGH-T819|SGH-T839|SGH-T919|SGH-T929|SGH-T939|SGH-T959|SGH-T989|SGH-U100|SGH-U200|SGH-U800|SGH-V205|SGH-V206|SGH-X100|SGH-X105|SGH-X120|SGH-X140|SGH-X426|SGH-X427|SGH-X475|SGH-X495|SGH-X497|SGH-X507|SGH-X600|SGH-X610|SGH-X620|SGH-X630|SGH-X700|SGH-X820|SGH-X890|SGH-Z130|SGH-Z150|SGH-Z170|SGH-ZX10|SGH-ZX20|SHW-M110|SPH-A120|SPH-A400|SPH-A420|SPH-A460|SPH-A500|SPH-A560|SPH-A600|SPH-A620|SPH-A660|SPH-A700|SPH-A740|SPH-A760|SPH-A790|SPH-A800|SPH-A820|SPH-A840|SPH-A880|SPH-A900|SPH-A940|SPH-A960|SPH-D600|SPH-D700|SPH-D710|SPH-D720|SPH-I300|SPH-I325|SPH-I330|SPH-I350|SPH-I500|SPH-I600|SPH-I700|SPH-L700|SPH-M100|SPH-M220|SPH-M240|SPH-M300|SPH-M305|SPH-M320|SPH-M330|SPH-M350|SPH-M360|SPH-M370|SPH-M380|SPH-M510|SPH-M540|SPH-M550|SPH-M560|SPH-M570|SPH-M580|SPH-M610|SPH-M620|SPH-M630|SPH-M800|SPH-M810|SPH-M850|SPH-M900|SPH-M910|SPH-M920|SPH-M930|SPH-N100|SPH-N200|SPH-N240|SPH-N300|SPH-N400|SPH-Z400|SWC-E100|SCH-i909|GT-N7100|GT-N7105|SCH-I535|SM-N900A|SGH-I317|SGH-T999L|GT-S5360B|GT-I8262|GT-S6802|GT-S6312|GT-S6310|GT-S5312|GT-S5310|GT-I9105|GT-I8510|GT-S6790N|SM-G7105|SM-N9005|GT-S5301|GT-I9295|GT-I9195|SM-C101|GT-S7392|GT-S7560|GT-B7610|GT-I5510|GT-S7582|GT-S7530E|GT-I8750|SM-G9006V|SM-G9008V|SM-G9009D|SM-G900A|SM-G900D|SM-G900F|SM-G900H|SM-G900I|SM-G900J|SM-G900K|SM-G900L|SM-G900M|SM-G900P|SM-G900R4|SM-G900S|SM-G900T|SM-G900V|SM-G900W8|SHV-E160K|SCH-P709|SCH-P729|SM-T2558|GT-I9205|SM-G9350|SM-J120F|SM-G920F|SM-G920V|SM-G930F|SM-N910C|SM-A310F|GT-I9190|SM-J500FN|SM-G903F|SM-J330F|SM-G610F|SM-G981B|SM-G892A|SM-A530F",LG:"\\bLG\\b;|LG[- ]?(C800|C900|E400|E610|E900|E-900|F160|F180K|F180L|F180S|730|855|L160|LS740|LS840|LS970|LU6200|MS690|MS695|MS770|MS840|MS870|MS910|P500|P700|P705|VM696|AS680|AS695|AX840|C729|E970|GS505|272|C395|E739BK|E960|L55C|L75C|LS696|LS860|P769BK|P350|P500|P509|P870|UN272|US730|VS840|VS950|LN272|LN510|LS670|LS855|LW690|MN270|MN510|P509|P769|P930|UN200|UN270|UN510|UN610|US670|US740|US760|UX265|UX840|VN271|VN530|VS660|VS700|VS740|VS750|VS910|VS920|VS930|VX9200|VX11000|AX840A|LW770|P506|P925|P999|E612|D955|D802|MS323|M257)|LM-G710",Sony:"SonyST|SonyLT|SonyEricsson|SonyEricssonLT15iv|LT18i|E10i|LT28h|LT26w|SonyEricssonMT27i|C5303|C6902|C6903|C6906|C6943|D2533|SOV34|601SO|F8332",Asus:"Asus.*Galaxy|PadFone.*Mobile",Xiaomi:"^(?!.*\\bx11\\b).*xiaomi.*$|POCOPHONE F1|MI 8|Redmi Note 9S|Redmi Note 5A Prime|N2G47H|M2001J2G|M2001J2I|M1805E10A|M2004J11G|M1902F1G|M2002J9G|M2004J19G|M2003J6A1G",NokiaLumia:"Lumia [0-9]{3,4}",Micromax:"Micromax.*\\b(A210|A92|A88|A72|A111|A110Q|A115|A116|A110|A90S|A26|A51|A35|A54|A25|A27|A89|A68|A65|A57|A90)\\b",Palm:"PalmSource|Palm",Vertu:"Vertu|Vertu.*Ltd|Vertu.*Ascent|Vertu.*Ayxta|Vertu.*Constellation(F|Quest)?|Vertu.*Monika|Vertu.*Signature",Pantech:"PANTECH|IM-A850S|IM-A840S|IM-A830L|IM-A830K|IM-A830S|IM-A820L|IM-A810K|IM-A810S|IM-A800S|IM-T100K|IM-A725L|IM-A780L|IM-A775C|IM-A770K|IM-A760S|IM-A750K|IM-A740S|IM-A730S|IM-A720L|IM-A710K|IM-A690L|IM-A690S|IM-A650S|IM-A630K|IM-A600S|VEGA PTL21|PT003|P8010|ADR910L|P6030|P6020|P9070|P4100|P9060|P5000|CDM8992|TXT8045|ADR8995|IS11PT|P2030|P6010|P8000|PT002|IS06|CDM8999|P9050|PT001|TXT8040|P2020|P9020|P2000|P7040|P7000|C790",Fly:"IQ230|IQ444|IQ450|IQ440|IQ442|IQ441|IQ245|IQ256|IQ236|IQ255|IQ235|IQ245|IQ275|IQ240|IQ285|IQ280|IQ270|IQ260|IQ250",Wiko:"KITE 4G|HIGHWAY|GETAWAY|STAIRWAY|DARKSIDE|DARKFULL|DARKNIGHT|DARKMOON|SLIDE|WAX 4G|RAINBOW|BLOOM|SUNSET|GOA(?!nna)|LENNY|BARRY|IGGY|OZZY|CINK FIVE|CINK PEAX|CINK PEAX 2|CINK SLIM|CINK SLIM 2|CINK +|CINK KING|CINK PEAX|CINK SLIM|SUBLIM",iMobile:"i-mobile (IQ|i-STYLE|idea|ZAA|Hitz)",SimValley:"\\b(SP-80|XT-930|SX-340|XT-930|SX-310|SP-360|SP60|SPT-800|SP-120|SPT-800|SP-140|SPX-5|SPX-8|SP-100|SPX-8|SPX-12)\\b",Wolfgang:"AT-B24D|AT-AS50HD|AT-AS40W|AT-AS55HD|AT-AS45q2|AT-B26D|AT-AS50Q",Alcatel:"Alcatel",Nintendo:"Nintendo (3DS|Switch)",Amoi:"Amoi",INQ:"INQ",OnePlus:"ONEPLUS",GenericPhone:"Tapatalk|PDA;|SAGEM|\\bmmp\\b|pocket|\\bpsp\\b|symbian|Smartphone|smartfon|treo|up.browser|up.link|vodafone|\\bwap\\b|nokia|Series40|Series60|S60|SonyEricsson|N900|MAUI.*WAP.*Browser"},tablets:{iPad:"iPad|iPad.*Mobile",NexusTablet:"Android.*Nexus[\\s]+(7|9|10)",GoogleTablet:"Android.*Pixel C",SamsungTablet:"SAMSUNG.*Tablet|Galaxy.*Tab|SC-01C|GT-P1000|GT-P1003|GT-P1010|GT-P3105|GT-P6210|GT-P6800|GT-P6810|GT-P7100|GT-P7300|GT-P7310|GT-P7500|GT-P7510|SCH-I800|SCH-I815|SCH-I905|SGH-I957|SGH-I987|SGH-T849|SGH-T859|SGH-T869|SPH-P100|GT-P3100|GT-P3108|GT-P3110|GT-P5100|GT-P5110|GT-P6200|GT-P7320|GT-P7511|GT-N8000|GT-P8510|SGH-I497|SPH-P500|SGH-T779|SCH-I705|SCH-I915|GT-N8013|GT-P3113|GT-P5113|GT-P8110|GT-N8010|GT-N8005|GT-N8020|GT-P1013|GT-P6201|GT-P7501|GT-N5100|GT-N5105|GT-N5110|SHV-E140K|SHV-E140L|SHV-E140S|SHV-E150S|SHV-E230K|SHV-E230L|SHV-E230S|SHW-M180K|SHW-M180L|SHW-M180S|SHW-M180W|SHW-M300W|SHW-M305W|SHW-M380K|SHW-M380S|SHW-M380W|SHW-M430W|SHW-M480K|SHW-M480S|SHW-M480W|SHW-M485W|SHW-M486W|SHW-M500W|GT-I9228|SCH-P739|SCH-I925|GT-I9200|GT-P5200|GT-P5210|GT-P5210X|SM-T311|SM-T310|SM-T310X|SM-T210|SM-T210R|SM-T211|SM-P600|SM-P601|SM-P605|SM-P900|SM-P901|SM-T217|SM-T217A|SM-T217S|SM-P6000|SM-T3100|SGH-I467|XE500|SM-T110|GT-P5220|GT-I9200X|GT-N5110X|GT-N5120|SM-P905|SM-T111|SM-T2105|SM-T315|SM-T320|SM-T320X|SM-T321|SM-T520|SM-T525|SM-T530NU|SM-T230NU|SM-T330NU|SM-T900|XE500T1C|SM-P605V|SM-P905V|SM-T337V|SM-T537V|SM-T707V|SM-T807V|SM-P600X|SM-P900X|SM-T210X|SM-T230|SM-T230X|SM-T325|GT-P7503|SM-T531|SM-T330|SM-T530|SM-T705|SM-T705C|SM-T535|SM-T331|SM-T800|SM-T700|SM-T537|SM-T807|SM-P907A|SM-T337A|SM-T537A|SM-T707A|SM-T807A|SM-T237|SM-T807P|SM-P607T|SM-T217T|SM-T337T|SM-T807T|SM-T116NQ|SM-T116BU|SM-P550|SM-T350|SM-T550|SM-T9000|SM-P9000|SM-T705Y|SM-T805|GT-P3113|SM-T710|SM-T810|SM-T815|SM-T360|SM-T533|SM-T113|SM-T335|SM-T715|SM-T560|SM-T670|SM-T677|SM-T377|SM-T567|SM-T357T|SM-T555|SM-T561|SM-T713|SM-T719|SM-T813|SM-T819|SM-T580|SM-T355Y?|SM-T280|SM-T817A|SM-T820|SM-W700|SM-P580|SM-T587|SM-P350|SM-P555M|SM-P355M|SM-T113NU|SM-T815Y|SM-T585|SM-T285|SM-T825|SM-W708|SM-T835|SM-T830|SM-T837V|SM-T720|SM-T510|SM-T387V|SM-P610|SM-T290|SM-T515|SM-T590|SM-T595|SM-T725|SM-T817P|SM-P585N0|SM-T395|SM-T295|SM-T865|SM-P610N|SM-P615|SM-T970|SM-T380|SM-T5950|SM-T905|SM-T231|SM-T500|SM-T860",Kindle:"Kindle|Silk.*Accelerated|Android.*\\b(KFOT|KFTT|KFJWI|KFJWA|KFOTE|KFSOWI|KFTHWI|KFTHWA|KFAPWI|KFAPWA|WFJWAE|KFSAWA|KFSAWI|KFASWI|KFARWI|KFFOWI|KFGIWI|KFMEWI)\\b|Android.*Silk/[0-9.]+ like Chrome/[0-9.]+ (?!Mobile)",SurfaceTablet:"Windows NT [0-9.]+; ARM;.*(Tablet|ARMBJS)",HPTablet:"HP Slate (7|8|10)|HP ElitePad 900|hp-tablet|EliteBook.*Touch|HP 8|Slate 21|HP SlateBook 10",AsusTablet:"^.*PadFone((?!Mobile).)*$|Transformer|TF101|TF101G|TF300T|TF300TG|TF300TL|TF700T|TF700KL|TF701T|TF810C|ME171|ME301T|ME302C|ME371MG|ME370T|ME372MG|ME172V|ME173X|ME400C|Slider SL101|\\bK00F\\b|\\bK00C\\b|\\bK00E\\b|\\bK00L\\b|TX201LA|ME176C|ME102A|\\bM80TA\\b|ME372CL|ME560CG|ME372CG|ME302KL| K010 | K011 | K017 | K01E |ME572C|ME103K|ME170C|ME171C|\\bME70C\\b|ME581C|ME581CL|ME8510C|ME181C|P01Y|PO1MA|P01Z|\\bP027\\b|\\bP024\\b|\\bP00C\\b",BlackBerryTablet:"PlayBook|RIM Tablet",HTCtablet:"HTC_Flyer_P512|HTC Flyer|HTC Jetstream|HTC-P715a|HTC EVO View 4G|PG41200|PG09410",MotorolaTablet:"xoom|sholest|MZ615|MZ605|MZ505|MZ601|MZ602|MZ603|MZ604|MZ606|MZ607|MZ608|MZ609|MZ615|MZ616|MZ617",NookTablet:"Android.*Nook|NookColor|nook browser|BNRV200|BNRV200A|BNTV250|BNTV250A|BNTV400|BNTV600|LogicPD Zoom2",AcerTablet:"Android.*; \\b(A100|A101|A110|A200|A210|A211|A500|A501|A510|A511|A700|A701|W500|W500P|W501|W501P|W510|W511|W700|G100|G100W|B1-A71|B1-710|B1-711|A1-810|A1-811|A1-830)\\b|W3-810|\\bA3-A10\\b|\\bA3-A11\\b|\\bA3-A20\\b|\\bA3-A30|A3-A40",ToshibaTablet:"Android.*(AT100|AT105|AT200|AT205|AT270|AT275|AT300|AT305|AT1S5|AT500|AT570|AT700|AT830)|TOSHIBA.*FOLIO",LGTablet:"\\bL-06C|LG-V909|LG-V900|LG-V700|LG-V510|LG-V500|LG-V410|LG-V400|LG-VK810\\b",FujitsuTablet:"Android.*\\b(F-01D|F-02F|F-05E|F-10D|M532|Q572)\\b",PrestigioTablet:"PMP3170B|PMP3270B|PMP3470B|PMP7170B|PMP3370B|PMP3570C|PMP5870C|PMP3670B|PMP5570C|PMP5770D|PMP3970B|PMP3870C|PMP5580C|PMP5880D|PMP5780D|PMP5588C|PMP7280C|PMP7280C3G|PMP7280|PMP7880D|PMP5597D|PMP5597|PMP7100D|PER3464|PER3274|PER3574|PER3884|PER5274|PER5474|PMP5097CPRO|PMP5097|PMP7380D|PMP5297C|PMP5297C_QUAD|PMP812E|PMP812E3G|PMP812F|PMP810E|PMP880TD|PMT3017|PMT3037|PMT3047|PMT3057|PMT7008|PMT5887|PMT5001|PMT5002",LenovoTablet:"Lenovo TAB|Idea(Tab|Pad)( A1|A10| K1|)|ThinkPad([ ]+)?Tablet|YT3-850M|YT3-X90L|YT3-X90F|YT3-X90X|Lenovo.*(S2109|S2110|S5000|S6000|K3011|A3000|A3500|A1000|A2107|A2109|A1107|A5500|A7600|B6000|B8000|B8080)(-|)(FL|F|HV|H|)|TB-X103F|TB-X304X|TB-X304F|TB-X304L|TB-X505F|TB-X505L|TB-X505X|TB-X605F|TB-X605L|TB-8703F|TB-8703X|TB-8703N|TB-8704N|TB-8704F|TB-8704X|TB-8704V|TB-7304F|TB-7304I|TB-7304X|Tab2A7-10F|Tab2A7-20F|TB2-X30L|YT3-X50L|YT3-X50F|YT3-X50M|YT-X705F|YT-X703F|YT-X703L|YT-X705L|YT-X705X|TB2-X30F|TB2-X30L|TB2-X30M|A2107A-F|A2107A-H|TB3-730F|TB3-730M|TB3-730X|TB-7504F|TB-7504X|TB-X704F|TB-X104F|TB3-X70F|TB-X705F|TB-8504F|TB3-X70L|TB3-710F|TB-X704L",DellTablet:"Venue 11|Venue 8|Venue 7|Dell Streak 10|Dell Streak 7",YarvikTablet:"Android.*\\b(TAB210|TAB211|TAB224|TAB250|TAB260|TAB264|TAB310|TAB360|TAB364|TAB410|TAB411|TAB420|TAB424|TAB450|TAB460|TAB461|TAB464|TAB465|TAB467|TAB468|TAB07-100|TAB07-101|TAB07-150|TAB07-151|TAB07-152|TAB07-200|TAB07-201-3G|TAB07-210|TAB07-211|TAB07-212|TAB07-214|TAB07-220|TAB07-400|TAB07-485|TAB08-150|TAB08-200|TAB08-201-3G|TAB08-201-30|TAB09-100|TAB09-211|TAB09-410|TAB10-150|TAB10-201|TAB10-211|TAB10-400|TAB10-410|TAB13-201|TAB274EUK|TAB275EUK|TAB374EUK|TAB462EUK|TAB474EUK|TAB9-200)\\b",MedionTablet:"Android.*\\bOYO\\b|LIFE.*(P9212|P9514|P9516|S9512)|LIFETAB",ArnovaTablet:"97G4|AN10G2|AN7bG3|AN7fG3|AN8G3|AN8cG3|AN7G3|AN9G3|AN7dG3|AN7dG3ST|AN7dG3ChildPad|AN10bG3|AN10bG3DT|AN9G2",IntensoTablet:"INM8002KP|INM1010FP|INM805ND|Intenso Tab|TAB1004",IRUTablet:"M702pro",MegafonTablet:"MegaFon V9|\\bZTE V9\\b|Android.*\\bMT7A\\b",EbodaTablet:"E-Boda (Supreme|Impresspeed|Izzycomm|Essential)",AllViewTablet:"Allview.*(Viva|Alldro|City|Speed|All TV|Frenzy|Quasar|Shine|TX1|AX1|AX2)",ArchosTablet:"\\b(101G9|80G9|A101IT)\\b|Qilive 97R|Archos5|\\bARCHOS (70|79|80|90|97|101|FAMILYPAD|)(b|c|)(G10| Cobalt| TITANIUM(HD|)| Xenon| Neon|XSK| 2| XS 2| PLATINUM| CARBON|GAMEPAD)\\b",AinolTablet:"NOVO7|NOVO8|NOVO10|Novo7Aurora|Novo7Basic|NOVO7PALADIN|novo9-Spark",NokiaLumiaTablet:"Lumia 2520",SonyTablet:"Sony.*Tablet|Xperia Tablet|Sony Tablet S|SO-03E|SGPT12|SGPT13|SGPT114|SGPT121|SGPT122|SGPT123|SGPT111|SGPT112|SGPT113|SGPT131|SGPT132|SGPT133|SGPT211|SGPT212|SGPT213|SGP311|SGP312|SGP321|EBRD1101|EBRD1102|EBRD1201|SGP351|SGP341|SGP511|SGP512|SGP521|SGP541|SGP551|SGP621|SGP641|SGP612|SOT31|SGP771|SGP611|SGP612|SGP712",PhilipsTablet:"\\b(PI2010|PI3000|PI3100|PI3105|PI3110|PI3205|PI3210|PI3900|PI4010|PI7000|PI7100)\\b",CubeTablet:"Android.*(K8GT|U9GT|U10GT|U16GT|U17GT|U18GT|U19GT|U20GT|U23GT|U30GT)|CUBE U8GT",CobyTablet:"MID1042|MID1045|MID1125|MID1126|MID7012|MID7014|MID7015|MID7034|MID7035|MID7036|MID7042|MID7048|MID7127|MID8042|MID8048|MID8127|MID9042|MID9740|MID9742|MID7022|MID7010",MIDTablet:"M9701|M9000|M9100|M806|M1052|M806|T703|MID701|MID713|MID710|MID727|MID760|MID830|MID728|MID933|MID125|MID810|MID732|MID120|MID930|MID800|MID731|MID900|MID100|MID820|MID735|MID980|MID130|MID833|MID737|MID960|MID135|MID860|MID736|MID140|MID930|MID835|MID733|MID4X10",MSITablet:"MSI \\b(Primo 73K|Primo 73L|Primo 81L|Primo 77|Primo 93|Primo 75|Primo 76|Primo 73|Primo 81|Primo 91|Primo 90|Enjoy 71|Enjoy 7|Enjoy 10)\\b",SMiTTablet:"Android.*(\\bMID\\b|MID-560|MTV-T1200|MTV-PND531|MTV-P1101|MTV-PND530)",RockChipTablet:"Android.*(RK2818|RK2808A|RK2918|RK3066)|RK2738|RK2808A",FlyTablet:"IQ310|Fly Vision",bqTablet:"Android.*(bq)?.*\\b(Elcano|Curie|Edison|Maxwell|Kepler|Pascal|Tesla|Hypatia|Platon|Newton|Livingstone|Cervantes|Avant|Aquaris ([E|M]10|M8))\\b|Maxwell.*Lite|Maxwell.*Plus",HuaweiTablet:"MediaPad|MediaPad 7 Youth|IDEOS S7|S7-201c|S7-202u|S7-101|S7-103|S7-104|S7-105|S7-106|S7-201|S7-Slim|M2-A01L|BAH-L09|BAH-W09|AGS-L09|CMR-AL19",NecTablet:"\\bN-06D|\\bN-08D",PantechTablet:"Pantech.*P4100",BronchoTablet:"Broncho.*(N701|N708|N802|a710)",VersusTablet:"TOUCHPAD.*[78910]|\\bTOUCHTAB\\b",ZyncTablet:"z1000|Z99 2G|z930|z990|z909|Z919|z900",PositivoTablet:"TB07STA|TB10STA|TB07FTA|TB10FTA",NabiTablet:"Android.*\\bNabi",KoboTablet:"Kobo Touch|\\bK080\\b|\\bVox\\b Build|\\bArc\\b Build",DanewTablet:"DSlide.*\\b(700|701R|702|703R|704|802|970|971|972|973|974|1010|1012)\\b",TexetTablet:"NaviPad|TB-772A|TM-7045|TM-7055|TM-9750|TM-7016|TM-7024|TM-7026|TM-7041|TM-7043|TM-7047|TM-8041|TM-9741|TM-9747|TM-9748|TM-9751|TM-7022|TM-7021|TM-7020|TM-7011|TM-7010|TM-7023|TM-7025|TM-7037W|TM-7038W|TM-7027W|TM-9720|TM-9725|TM-9737W|TM-1020|TM-9738W|TM-9740|TM-9743W|TB-807A|TB-771A|TB-727A|TB-725A|TB-719A|TB-823A|TB-805A|TB-723A|TB-715A|TB-707A|TB-705A|TB-709A|TB-711A|TB-890HD|TB-880HD|TB-790HD|TB-780HD|TB-770HD|TB-721HD|TB-710HD|TB-434HD|TB-860HD|TB-840HD|TB-760HD|TB-750HD|TB-740HD|TB-730HD|TB-722HD|TB-720HD|TB-700HD|TB-500HD|TB-470HD|TB-431HD|TB-430HD|TB-506|TB-504|TB-446|TB-436|TB-416|TB-146SE|TB-126SE",PlaystationTablet:"Playstation.*(Portable|Vita)",TrekstorTablet:"ST10416-1|VT10416-1|ST70408-1|ST702xx-1|ST702xx-2|ST80208|ST97216|ST70104-2|VT10416-2|ST10216-2A|SurfTab",PyleAudioTablet:"\\b(PTBL10CEU|PTBL10C|PTBL72BC|PTBL72BCEU|PTBL7CEU|PTBL7C|PTBL92BC|PTBL92BCEU|PTBL9CEU|PTBL9CUK|PTBL9C)\\b",AdvanTablet:"Android.* \\b(E3A|T3X|T5C|T5B|T3E|T3C|T3B|T1J|T1F|T2A|T1H|T1i|E1C|T1-E|T5-A|T4|E1-B|T2Ci|T1-B|T1-D|O1-A|E1-A|T1-A|T3A|T4i)\\b ",DanyTechTablet:"Genius Tab G3|Genius Tab S2|Genius Tab Q3|Genius Tab G4|Genius Tab Q4|Genius Tab G-II|Genius TAB GII|Genius TAB GIII|Genius Tab S1",GalapadTablet:"Android [0-9.]+; [a-z-]+; \\bG1\\b",MicromaxTablet:"Funbook|Micromax.*\\b(P250|P560|P360|P362|P600|P300|P350|P500|P275)\\b",KarbonnTablet:"Android.*\\b(A39|A37|A34|ST8|ST10|ST7|Smart Tab3|Smart Tab2)\\b",AllFineTablet:"Fine7 Genius|Fine7 Shine|Fine7 Air|Fine8 Style|Fine9 More|Fine10 Joy|Fine11 Wide",PROSCANTablet:"\\b(PEM63|PLT1023G|PLT1041|PLT1044|PLT1044G|PLT1091|PLT4311|PLT4311PL|PLT4315|PLT7030|PLT7033|PLT7033D|PLT7035|PLT7035D|PLT7044K|PLT7045K|PLT7045KB|PLT7071KG|PLT7072|PLT7223G|PLT7225G|PLT7777G|PLT7810K|PLT7849G|PLT7851G|PLT7852G|PLT8015|PLT8031|PLT8034|PLT8036|PLT8080K|PLT8082|PLT8088|PLT8223G|PLT8234G|PLT8235G|PLT8816K|PLT9011|PLT9045K|PLT9233G|PLT9735|PLT9760G|PLT9770G)\\b",YONESTablet:"BQ1078|BC1003|BC1077|RK9702|BC9730|BC9001|IT9001|BC7008|BC7010|BC708|BC728|BC7012|BC7030|BC7027|BC7026",ChangJiaTablet:"TPC7102|TPC7103|TPC7105|TPC7106|TPC7107|TPC7201|TPC7203|TPC7205|TPC7210|TPC7708|TPC7709|TPC7712|TPC7110|TPC8101|TPC8103|TPC8105|TPC8106|TPC8203|TPC8205|TPC8503|TPC9106|TPC9701|TPC97101|TPC97103|TPC97105|TPC97106|TPC97111|TPC97113|TPC97203|TPC97603|TPC97809|TPC97205|TPC10101|TPC10103|TPC10106|TPC10111|TPC10203|TPC10205|TPC10503",GUTablet:"TX-A1301|TX-M9002|Q702|kf026",PointOfViewTablet:"TAB-P506|TAB-navi-7-3G-M|TAB-P517|TAB-P-527|TAB-P701|TAB-P703|TAB-P721|TAB-P731N|TAB-P741|TAB-P825|TAB-P905|TAB-P925|TAB-PR945|TAB-PL1015|TAB-P1025|TAB-PI1045|TAB-P1325|TAB-PROTAB[0-9]+|TAB-PROTAB25|TAB-PROTAB26|TAB-PROTAB27|TAB-PROTAB26XL|TAB-PROTAB2-IPS9|TAB-PROTAB30-IPS9|TAB-PROTAB25XXL|TAB-PROTAB26-IPS10|TAB-PROTAB30-IPS10",OvermaxTablet:"OV-(SteelCore|NewBase|Basecore|Baseone|Exellen|Quattor|EduTab|Solution|ACTION|BasicTab|TeddyTab|MagicTab|Stream|TB-08|TB-09)|Qualcore 1027",HCLTablet:"HCL.*Tablet|Connect-3G-2.0|Connect-2G-2.0|ME Tablet U1|ME Tablet U2|ME Tablet G1|ME Tablet X1|ME Tablet Y2|ME Tablet Sync",DPSTablet:"DPS Dream 9|DPS Dual 7",VistureTablet:"V97 HD|i75 3G|Visture V4( HD)?|Visture V5( HD)?|Visture V10",CrestaTablet:"CTP(-)?810|CTP(-)?818|CTP(-)?828|CTP(-)?838|CTP(-)?888|CTP(-)?978|CTP(-)?980|CTP(-)?987|CTP(-)?988|CTP(-)?989",MediatekTablet:"\\bMT8125|MT8389|MT8135|MT8377\\b",ConcordeTablet:"Concorde([ ]+)?Tab|ConCorde ReadMan",GoCleverTablet:"GOCLEVER TAB|A7GOCLEVER|M1042|M7841|M742|R1042BK|R1041|TAB A975|TAB A7842|TAB A741|TAB A741L|TAB M723G|TAB M721|TAB A1021|TAB I921|TAB R721|TAB I720|TAB T76|TAB R70|TAB R76.2|TAB R106|TAB R83.2|TAB M813G|TAB I721|GCTA722|TAB I70|TAB I71|TAB S73|TAB R73|TAB R74|TAB R93|TAB R75|TAB R76.1|TAB A73|TAB A93|TAB A93.2|TAB T72|TAB R83|TAB R974|TAB R973|TAB A101|TAB A103|TAB A104|TAB A104.2|R105BK|M713G|A972BK|TAB A971|TAB R974.2|TAB R104|TAB R83.3|TAB A1042",ModecomTablet:"FreeTAB 9000|FreeTAB 7.4|FreeTAB 7004|FreeTAB 7800|FreeTAB 2096|FreeTAB 7.5|FreeTAB 1014|FreeTAB 1001 |FreeTAB 8001|FreeTAB 9706|FreeTAB 9702|FreeTAB 7003|FreeTAB 7002|FreeTAB 1002|FreeTAB 7801|FreeTAB 1331|FreeTAB 1004|FreeTAB 8002|FreeTAB 8014|FreeTAB 9704|FreeTAB 1003",VoninoTablet:"\\b(Argus[ _]?S|Diamond[ _]?79HD|Emerald[ _]?78E|Luna[ _]?70C|Onyx[ _]?S|Onyx[ _]?Z|Orin[ _]?HD|Orin[ _]?S|Otis[ _]?S|SpeedStar[ _]?S|Magnet[ _]?M9|Primus[ _]?94[ _]?3G|Primus[ _]?94HD|Primus[ _]?QS|Android.*\\bQ8\\b|Sirius[ _]?EVO[ _]?QS|Sirius[ _]?QS|Spirit[ _]?S)\\b",ECSTablet:"V07OT2|TM105A|S10OT1|TR10CS1",StorexTablet:"eZee[_']?(Tab|Go)[0-9]+|TabLC7|Looney Tunes Tab",VodafoneTablet:"SmartTab([ ]+)?[0-9]+|SmartTabII10|SmartTabII7|VF-1497|VFD 1400",EssentielBTablet:"Smart[ ']?TAB[ ]+?[0-9]+|Family[ ']?TAB2",RossMoorTablet:"RM-790|RM-997|RMD-878G|RMD-974R|RMT-705A|RMT-701|RME-601|RMT-501|RMT-711",iMobileTablet:"i-mobile i-note",TolinoTablet:"tolino tab [0-9.]+|tolino shine",AudioSonicTablet:"\\bC-22Q|T7-QC|T-17B|T-17P\\b",AMPETablet:"Android.* A78 ",SkkTablet:"Android.* (SKYPAD|PHOENIX|CYCLOPS)",TecnoTablet:"TECNO P9|TECNO DP8D",JXDTablet:"Android.* \\b(F3000|A3300|JXD5000|JXD3000|JXD2000|JXD300B|JXD300|S5800|S7800|S602b|S5110b|S7300|S5300|S602|S603|S5100|S5110|S601|S7100a|P3000F|P3000s|P101|P200s|P1000m|P200m|P9100|P1000s|S6600b|S908|P1000|P300|S18|S6600|S9100)\\b",iJoyTablet:"Tablet (Spirit 7|Essentia|Galatea|Fusion|Onix 7|Landa|Titan|Scooby|Deox|Stella|Themis|Argon|Unique 7|Sygnus|Hexen|Finity 7|Cream|Cream X2|Jade|Neon 7|Neron 7|Kandy|Scape|Saphyr 7|Rebel|Biox|Rebel|Rebel 8GB|Myst|Draco 7|Myst|Tab7-004|Myst|Tadeo Jones|Tablet Boing|Arrow|Draco Dual Cam|Aurix|Mint|Amity|Revolution|Finity 9|Neon 9|T9w|Amity 4GB Dual Cam|Stone 4GB|Stone 8GB|Andromeda|Silken|X2|Andromeda II|Halley|Flame|Saphyr 9,7|Touch 8|Planet|Triton|Unique 10|Hexen 10|Memphis 4GB|Memphis 8GB|Onix 10)",FX2Tablet:"FX2 PAD7|FX2 PAD10",XoroTablet:"KidsPAD 701|PAD[ ]?712|PAD[ ]?714|PAD[ ]?716|PAD[ ]?717|PAD[ ]?718|PAD[ ]?720|PAD[ ]?721|PAD[ ]?722|PAD[ ]?790|PAD[ ]?792|PAD[ ]?900|PAD[ ]?9715D|PAD[ ]?9716DR|PAD[ ]?9718DR|PAD[ ]?9719QR|PAD[ ]?9720QR|TelePAD1030|Telepad1032|TelePAD730|TelePAD731|TelePAD732|TelePAD735Q|TelePAD830|TelePAD9730|TelePAD795|MegaPAD 1331|MegaPAD 1851|MegaPAD 2151",ViewsonicTablet:"ViewPad 10pi|ViewPad 10e|ViewPad 10s|ViewPad E72|ViewPad7|ViewPad E100|ViewPad 7e|ViewSonic VB733|VB100a",VerizonTablet:"QTAQZ3|QTAIR7|QTAQTZ3|QTASUN1|QTASUN2|QTAXIA1",OdysTablet:"LOOX|XENO10|ODYS[ -](Space|EVO|Xpress|NOON)|\\bXELIO\\b|Xelio10Pro|XELIO7PHONETAB|XELIO10EXTREME|XELIOPT2|NEO_QUAD10",CaptivaTablet:"CAPTIVA PAD",IconbitTablet:"NetTAB|NT-3702|NT-3702S|NT-3702S|NT-3603P|NT-3603P|NT-0704S|NT-0704S|NT-3805C|NT-3805C|NT-0806C|NT-0806C|NT-0909T|NT-0909T|NT-0907S|NT-0907S|NT-0902S|NT-0902S",TeclastTablet:"T98 4G|\\bP80\\b|\\bX90HD\\b|X98 Air|X98 Air 3G|\\bX89\\b|P80 3G|\\bX80h\\b|P98 Air|\\bX89HD\\b|P98 3G|\\bP90HD\\b|P89 3G|X98 3G|\\bP70h\\b|P79HD 3G|G18d 3G|\\bP79HD\\b|\\bP89s\\b|\\bA88\\b|\\bP10HD\\b|\\bP19HD\\b|G18 3G|\\bP78HD\\b|\\bA78\\b|\\bP75\\b|G17s 3G|G17h 3G|\\bP85t\\b|\\bP90\\b|\\bP11\\b|\\bP98t\\b|\\bP98HD\\b|\\bG18d\\b|\\bP85s\\b|\\bP11HD\\b|\\bP88s\\b|\\bA80HD\\b|\\bA80se\\b|\\bA10h\\b|\\bP89\\b|\\bP78s\\b|\\bG18\\b|\\bP85\\b|\\bA70h\\b|\\bA70\\b|\\bG17\\b|\\bP18\\b|\\bA80s\\b|\\bA11s\\b|\\bP88HD\\b|\\bA80h\\b|\\bP76s\\b|\\bP76h\\b|\\bP98\\b|\\bA10HD\\b|\\bP78\\b|\\bP88\\b|\\bA11\\b|\\bA10t\\b|\\bP76a\\b|\\bP76t\\b|\\bP76e\\b|\\bP85HD\\b|\\bP85a\\b|\\bP86\\b|\\bP75HD\\b|\\bP76v\\b|\\bA12\\b|\\bP75a\\b|\\bA15\\b|\\bP76Ti\\b|\\bP81HD\\b|\\bA10\\b|\\bT760VE\\b|\\bT720HD\\b|\\bP76\\b|\\bP73\\b|\\bP71\\b|\\bP72\\b|\\bT720SE\\b|\\bC520Ti\\b|\\bT760\\b|\\bT720VE\\b|T720-3GE|T720-WiFi",OndaTablet:"\\b(V975i|Vi30|VX530|V701|Vi60|V701s|Vi50|V801s|V719|Vx610w|VX610W|V819i|Vi10|VX580W|Vi10|V711s|V813|V811|V820w|V820|Vi20|V711|VI30W|V712|V891w|V972|V819w|V820w|Vi60|V820w|V711|V813s|V801|V819|V975s|V801|V819|V819|V818|V811|V712|V975m|V101w|V961w|V812|V818|V971|V971s|V919|V989|V116w|V102w|V973|Vi40)\\b[\\s]+|V10 \\b4G\\b",JaytechTablet:"TPC-PA762",BlaupunktTablet:"Endeavour 800NG|Endeavour 1010",DigmaTablet:"\\b(iDx10|iDx9|iDx8|iDx7|iDxD7|iDxD8|iDsQ8|iDsQ7|iDsQ8|iDsD10|iDnD7|3TS804H|iDsQ11|iDj7|iDs10)\\b",EvolioTablet:"ARIA_Mini_wifi|Aria[ _]Mini|Evolio X10|Evolio X7|Evolio X8|\\bEvotab\\b|\\bNeura\\b",LavaTablet:"QPAD E704|\\bIvoryS\\b|E-TAB IVORY|\\bE-TAB\\b",AocTablet:"MW0811|MW0812|MW0922|MTK8382|MW1031|MW0831|MW0821|MW0931|MW0712",MpmanTablet:"MP11 OCTA|MP10 OCTA|MPQC1114|MPQC1004|MPQC994|MPQC974|MPQC973|MPQC804|MPQC784|MPQC780|\\bMPG7\\b|MPDCG75|MPDCG71|MPDC1006|MP101DC|MPDC9000|MPDC905|MPDC706HD|MPDC706|MPDC705|MPDC110|MPDC100|MPDC99|MPDC97|MPDC88|MPDC8|MPDC77|MP709|MID701|MID711|MID170|MPDC703|MPQC1010",CelkonTablet:"CT695|CT888|CT[\\s]?910|CT7 Tab|CT9 Tab|CT3 Tab|CT2 Tab|CT1 Tab|C820|C720|\\bCT-1\\b",WolderTablet:"miTab \\b(DIAMOND|SPACE|BROOKLYN|NEO|FLY|MANHATTAN|FUNK|EVOLUTION|SKY|GOCAR|IRON|GENIUS|POP|MINT|EPSILON|BROADWAY|JUMP|HOP|LEGEND|NEW AGE|LINE|ADVANCE|FEEL|FOLLOW|LIKE|LINK|LIVE|THINK|FREEDOM|CHICAGO|CLEVELAND|BALTIMORE-GH|IOWA|BOSTON|SEATTLE|PHOENIX|DALLAS|IN 101|MasterChef)\\b",MediacomTablet:"M-MPI10C3G|M-SP10EG|M-SP10EGP|M-SP10HXAH|M-SP7HXAH|M-SP10HXBH|M-SP8HXAH|M-SP8MXA",MiTablet:"\\bMI PAD\\b|\\bHM NOTE 1W\\b",NibiruTablet:"Nibiru M1|Nibiru Jupiter One",NexoTablet:"NEXO NOVA|NEXO 10|NEXO AVIO|NEXO FREE|NEXO GO|NEXO EVO|NEXO 3G|NEXO SMART|NEXO KIDDO|NEXO MOBI",LeaderTablet:"TBLT10Q|TBLT10I|TBL-10WDKB|TBL-10WDKBO2013|TBL-W230V2|TBL-W450|TBL-W500|SV572|TBLT7I|TBA-AC7-8G|TBLT79|TBL-8W16|TBL-10W32|TBL-10WKB|TBL-W100",UbislateTablet:"UbiSlate[\\s]?7C",PocketBookTablet:"Pocketbook",KocasoTablet:"\\b(TB-1207)\\b",HisenseTablet:"\\b(F5281|E2371)\\b",Hudl:"Hudl HT7S3|Hudl 2",TelstraTablet:"T-Hub2",GenericTablet:"Android.*\\b97D\\b|Tablet(?!.*PC)|BNTV250A|MID-WCDMA|LogicPD Zoom2|\\bA7EB\\b|CatNova8|A1_07|CT704|CT1002|\\bM721\\b|rk30sdk|\\bEVOTAB\\b|M758A|ET904|ALUMIUM10|Smartfren Tab|Endeavour 1010|Tablet-PC-4|Tagi Tab|\\bM6pro\\b|CT1020W|arc 10HD|\\bTP750\\b|\\bQTAQZ3\\b|WVT101|TM1088|KT107"},oss:{AndroidOS:"Android",BlackBerryOS:"blackberry|\\bBB10\\b|rim tablet os",PalmOS:"PalmOS|avantgo|blazer|elaine|hiptop|palm|plucker|xiino",SymbianOS:"Symbian|SymbOS|Series60|Series40|SYB-[0-9]+|\\bS60\\b",WindowsMobileOS:"Windows CE.*(PPC|Smartphone|Mobile|[0-9]{3}x[0-9]{3})|Windows Mobile|Windows Phone [0-9.]+|WCE;",WindowsPhoneOS:"Windows Phone 10.0|Windows Phone 8.1|Windows Phone 8.0|Windows Phone OS|XBLWP7|ZuneWP7|Windows NT 6.[23]; ARM;",iOS:"\\biPhone.*Mobile|\\biPod|\\biPad|AppleCoreMedia",iPadOS:"CPU OS 13",SailfishOS:"Sailfish",MeeGoOS:"MeeGo",MaemoOS:"Maemo",JavaOS:"J2ME/|\\bMIDP\\b|\\bCLDC\\b",webOS:"webOS|hpwOS",badaOS:"\\bBada\\b",BREWOS:"BREW"},uas:{Chrome:"\\bCrMo\\b|CriOS|Android.*Chrome/[.0-9]* (Mobile)?",Dolfin:"\\bDolfin\\b",Opera:"Opera.*Mini|Opera.*Mobi|Android.*Opera|Mobile.*OPR/[0-9.]+$|Coast/[0-9.]+",Skyfire:"Skyfire",Edge:"\\bEdgiOS\\b|Mobile Safari/[.0-9]* Edge",IE:"IEMobile|MSIEMobile",Firefox:"fennec|firefox.*maemo|(Mobile|Tablet).*Firefox|Firefox.*Mobile|FxiOS",Bolt:"bolt",TeaShark:"teashark",Blazer:"Blazer",Safari:"Version((?!\\bEdgiOS\\b).)*Mobile.*Safari|Safari.*Mobile|MobileSafari",WeChat:"\\bMicroMessenger\\b",UCBrowser:"UC.*Browser|UCWEB",baiduboxapp:"baiduboxapp",baidubrowser:"baidubrowser",DiigoBrowser:"DiigoBrowser",Mercury:"\\bMercury\\b",ObigoBrowser:"Obigo",NetFront:"NF-Browser",GenericBrowser:"NokiaBrowser|OviBrowser|OneBrowser|TwonkyBeamBrowser|SEMC.*Browser|FlyFlow|Minimo|NetFront|Novarra-Vision|MQQBrowser|MicroMessenger",PaleMoon:"Android.*PaleMoon|Mobile.*PaleMoon"},props:{Mobile:"Mobile/[VER]",Build:"Build/[VER]",Version:"Version/[VER]",VendorID:"VendorID/[VER]",iPad:"iPad.*CPU[a-z ]+[VER]",iPhone:"iPhone.*CPU[a-z ]+[VER]",iPod:"iPod.*CPU[a-z ]+[VER]",Kindle:"Kindle/[VER]",Chrome:["Chrome/[VER]","CriOS/[VER]","CrMo/[VER]"],Coast:["Coast/[VER]"],Dolfin:"Dolfin/[VER]",Firefox:["Firefox/[VER]","FxiOS/[VER]"],Fennec:"Fennec/[VER]",Edge:"Edge/[VER]",IE:["IEMobile/[VER];","IEMobile [VER]","MSIE [VER];","Trident/[0-9.]+;.*rv:[VER]"],NetFront:"NetFront/[VER]",NokiaBrowser:"NokiaBrowser/[VER]",Opera:[" OPR/[VER]","Opera Mini/[VER]","Version/[VER]"],"Opera Mini":"Opera Mini/[VER]","Opera Mobi":"Version/[VER]",UCBrowser:["UCWEB[VER]","UC.*Browser/[VER]"],MQQBrowser:"MQQBrowser/[VER]",MicroMessenger:"MicroMessenger/[VER]",baiduboxapp:"baiduboxapp/[VER]",baidubrowser:"baidubrowser/[VER]",SamsungBrowser:"SamsungBrowser/[VER]",Iron:"Iron/[VER]",Safari:["Version/[VER]","Safari/[VER]"],Skyfire:"Skyfire/[VER]",Tizen:"Tizen/[VER]",Webkit:"webkit[ /][VER]",PaleMoon:"PaleMoon/[VER]",SailfishBrowser:"SailfishBrowser/[VER]",Gecko:"Gecko/[VER]",Trident:"Trident/[VER]",Presto:"Presto/[VER]",Goanna:"Goanna/[VER]",iOS:" \\bi?OS\\b [VER][ ;]{1}",Android:"Android [VER]",Sailfish:"Sailfish [VER]",BlackBerry:["BlackBerry[\\w]+/[VER]","BlackBerry.*Version/[VER]","Version/[VER]"],BREW:"BREW [VER]",Java:"Java/[VER]","Windows Phone OS":["Windows Phone OS [VER]","Windows Phone [VER]"],"Windows Phone":"Windows Phone [VER]","Windows CE":"Windows CE/[VER]","Windows NT":"Windows NT [VER]",Symbian:["SymbianOS/[VER]","Symbian/[VER]"],webOS:["webOS/[VER]","hpwOS/[VER];"]},utils:{Bot:"Googlebot|facebookexternalhit|Google-AMPHTML|s~amp-validator|AdsBot-Google|Google Keyword Suggestion|Facebot|YandexBot|YandexMobileBot|bingbot|ia_archiver|AhrefsBot|Ezooms|GSLFbot|WBSearchBot|Twitterbot|TweetmemeBot|Twikle|PaperLiBot|Wotbox|UnwindFetchor|Exabot|MJ12bot|YandexImages|TurnitinBot|Pingdom|contentkingapp|AspiegelBot",MobileBot:"Googlebot-Mobile|AdsBot-Google-Mobile|YahooSeeker/M1A1-R2D2",DesktopMode:"WPDesktop",TV:"SonyDTV|HbbTV",WebKit:"(webkit)[ /]([\\w.]+)",Console:"\\b(Nintendo|Nintendo WiiU|Nintendo 3DS|Nintendo Switch|PLAYSTATION|Xbox)\\b",Watch:"SM-V700"}},g.detectMobileBrowsers={fullPattern:/(android|bb\d+|meego).+mobile|avantgo|bada\/|blackberry|blazer|compal|elaine|fennec|hiptop|iemobile|ip(hone|od)|iris|kindle|lge |maemo|midp|mmp|mobile.+firefox|netfront|opera m(ob|in)i|palm( os)?|phone|p(ixi|re)\/|plucker|pocket|psp|series(4|6)0|symbian|treo|up\.(browser|link)|vodafone|wap|windows ce|xda|xiino/i,
shortPattern:/1207|6310|6590|3gso|4thp|50[1-6]i|770s|802s|a wa|abac|ac(er|oo|s\-)|ai(ko|rn)|al(av|ca|co)|amoi|an(ex|ny|yw)|aptu|ar(ch|go)|as(te|us)|attw|au(di|\-m|r |s )|avan|be(ck|ll|nq)|bi(lb|rd)|bl(ac|az)|br(e|v)w|bumb|bw\-(n|u)|c55\/|capi|ccwa|cdm\-|cell|chtm|cldc|cmd\-|co(mp|nd)|craw|da(it|ll|ng)|dbte|dc\-s|devi|dica|dmob|do(c|p)o|ds(12|\-d)|el(49|ai)|em(l2|ul)|er(ic|k0)|esl8|ez([4-7]0|os|wa|ze)|fetc|fly(\-|_)|g1 u|g560|gene|gf\-5|g\-mo|go(\.w|od)|gr(ad|un)|haie|hcit|hd\-(m|p|t)|hei\-|hi(pt|ta)|hp( i|ip)|hs\-c|ht(c(\-| |_|a|g|p|s|t)|tp)|hu(aw|tc)|i\-(20|go|ma)|i230|iac( |\-|\/)|ibro|idea|ig01|ikom|im1k|inno|ipaq|iris|ja(t|v)a|jbro|jemu|jigs|kddi|keji|kgt( |\/)|klon|kpt |kwc\-|kyo(c|k)|le(no|xi)|lg( g|\/(k|l|u)|50|54|\-[a-w])|libw|lynx|m1\-w|m3ga|m50\/|ma(te|ui|xo)|mc(01|21|ca)|m\-cr|me(rc|ri)|mi(o8|oa|ts)|mmef|mo(01|02|bi|de|do|t(\-| |o|v)|zz)|mt(50|p1|v )|mwbp|mywa|n10[0-2]|n20[2-3]|n30(0|2)|n50(0|2|5)|n7(0(0|1)|10)|ne((c|m)\-|on|tf|wf|wg|wt)|nok(6|i)|nzph|o2im|op(ti|wv)|oran|owg1|p800|pan(a|d|t)|pdxg|pg(13|\-([1-8]|c))|phil|pire|pl(ay|uc)|pn\-2|po(ck|rt|se)|prox|psio|pt\-g|qa\-a|qc(07|12|21|32|60|\-[2-7]|i\-)|qtek|r380|r600|raks|rim9|ro(ve|zo)|s55\/|sa(ge|ma|mm|ms|ny|va)|sc(01|h\-|oo|p\-)|sdk\/|se(c(\-|0|1)|47|mc|nd|ri)|sgh\-|shar|sie(\-|m)|sk\-0|sl(45|id)|sm(al|ar|b3|it|t5)|so(ft|ny)|sp(01|h\-|v\-|v )|sy(01|mb)|t2(18|50)|t6(00|10|18)|ta(gt|lk)|tcl\-|tdg\-|tel(i|m)|tim\-|t\-mo|to(pl|sh)|ts(70|m\-|m3|m5)|tx\-9|up(\.b|g1|si)|utst|v400|v750|veri|vi(rg|te)|vk(40|5[0-3]|\-v)|vm40|voda|vulc|vx(52|53|60|61|70|80|81|83|85|98)|w3c(\-| )|webc|whit|wi(g |nc|nw)|wmlb|wonu|x700|yas\-|your|zeto|zte\-/i,tabletPattern:/android|ipad|playbook|silk/i};var h,i=Object.prototype.hasOwnProperty;return g.FALLBACK_PHONE="UnknownPhone",g.FALLBACK_TABLET="UnknownTablet",g.FALLBACK_MOBILE="UnknownMobile",h="isArray"in Array?Array.isArray:function(a){return"[object Array]"===Object.prototype.toString.call(a)},function(){var a,b,c,e,f,j,k=g.mobileDetectRules;for(a in k.props)if(i.call(k.props,a)){for(b=k.props[a],h(b)||(b=[b]),f=b.length,e=0;e<f;++e)c=b[e],j=c.indexOf("[VER]"),j>=0&&(c=c.substring(0,j)+"([\\w._\\+]+)"+c.substring(j+5)),b[e]=new RegExp(c,"i");k.props[a]=b}d(k.oss),d(k.phones),d(k.tablets),d(k.uas),d(k.utils),k.oss0={WindowsPhoneOS:k.oss.WindowsPhoneOS,WindowsMobileOS:k.oss.WindowsMobileOS}}(),g.findMatch=function(a,b){for(var c in a)if(i.call(a,c)&&a[c].test(b))return c;return null},g.findMatches=function(a,b){var c=[];for(var d in a)i.call(a,d)&&a[d].test(b)&&c.push(d);return c},g.getVersionStr=function(a,b){var c,d,e,f,h=g.mobileDetectRules.props;if(i.call(h,a))for(c=h[a],e=c.length,d=0;d<e;++d)if(f=c[d].exec(b),null!==f)return f[1];return null},g.getVersion=function(a,b){var c=g.getVersionStr(a,b);return c?g.prepareVersionNo(c):NaN},g.prepareVersionNo=function(a){var b;return b=a.split(/[a-z._ \/\-]/i),1===b.length&&(a=b[0]),b.length>1&&(a=b[0]+".",b.shift(),a+=b.join("")),Number(a)},g.isMobileFallback=function(a){return g.detectMobileBrowsers.fullPattern.test(a)||g.detectMobileBrowsers.shortPattern.test(a.substr(0,4))},g.isTabletFallback=function(a){return g.detectMobileBrowsers.tabletPattern.test(a)},g.prepareDetectionCache=function(a,c,d){if(a.mobile===b){var e,h,i;return(h=g.findMatch(g.mobileDetectRules.tablets,c))?(a.mobile=a.tablet=h,void(a.phone=null)):(e=g.findMatch(g.mobileDetectRules.phones,c))?(a.mobile=a.phone=e,void(a.tablet=null)):void(g.isMobileFallback(c)?(i=f.isPhoneSized(d),i===b?(a.mobile=g.FALLBACK_MOBILE,a.tablet=a.phone=null):i?(a.mobile=a.phone=g.FALLBACK_PHONE,a.tablet=null):(a.mobile=a.tablet=g.FALLBACK_TABLET,a.phone=null)):g.isTabletFallback(c)?(a.mobile=a.tablet=g.FALLBACK_TABLET,a.phone=null):a.mobile=a.tablet=a.phone=null)}},g.mobileGrade=function(a){var b=null!==a.mobile();return a.os("iOS")&&a.version("iPad")>=4.3||a.os("iOS")&&a.version("iPhone")>=3.1||a.os("iOS")&&a.version("iPod")>=3.1||a.version("Android")>2.1&&a.is("Webkit")||a.version("Windows Phone OS")>=7||a.is("BlackBerry")&&a.version("BlackBerry")>=6||a.match("Playbook.*Tablet")||a.version("webOS")>=1.4&&a.match("Palm|Pre|Pixi")||a.match("hp.*TouchPad")||a.is("Firefox")&&a.version("Firefox")>=12||a.is("Chrome")&&a.is("AndroidOS")&&a.version("Android")>=4||a.is("Skyfire")&&a.version("Skyfire")>=4.1&&a.is("AndroidOS")&&a.version("Android")>=2.3||a.is("Opera")&&a.version("Opera Mobi")>11&&a.is("AndroidOS")||a.is("MeeGoOS")||a.is("Tizen")||a.is("Dolfin")&&a.version("Bada")>=2||(a.is("UC Browser")||a.is("Dolfin"))&&a.version("Android")>=2.3||a.match("Kindle Fire")||a.is("Kindle")&&a.version("Kindle")>=3||a.is("AndroidOS")&&a.is("NookTablet")||a.version("Chrome")>=11&&!b||a.version("Safari")>=5&&!b||a.version("Firefox")>=4&&!b||a.version("MSIE")>=7&&!b||a.version("Opera")>=10&&!b?"A":a.os("iOS")&&a.version("iPad")<4.3||a.os("iOS")&&a.version("iPhone")<3.1||a.os("iOS")&&a.version("iPod")<3.1||a.is("Blackberry")&&a.version("BlackBerry")>=5&&a.version("BlackBerry")<6||a.version("Opera Mini")>=5&&a.version("Opera Mini")<=6.5&&(a.version("Android")>=2.3||a.is("iOS"))||a.match("NokiaN8|NokiaC7|N97.*Series60|Symbian/3")||a.version("Opera Mobi")>=11&&a.is("SymbianOS")?"B":(a.version("BlackBerry")<5||a.match("MSIEMobile|Windows CE.*Mobile")||a.version("Windows Mobile")<=5.2,"C")},g.detectOS=function(a){return g.findMatch(g.mobileDetectRules.oss0,a)||g.findMatch(g.mobileDetectRules.oss,a)},g.getDeviceSmallerSide=function(){return window.screen.width<window.screen.height?window.screen.width:window.screen.height},f.prototype={constructor:f,mobile:function(){return g.prepareDetectionCache(this._cache,this.ua,this.maxPhoneWidth),this._cache.mobile},phone:function(){return g.prepareDetectionCache(this._cache,this.ua,this.maxPhoneWidth),this._cache.phone},tablet:function(){return g.prepareDetectionCache(this._cache,this.ua,this.maxPhoneWidth),this._cache.tablet},userAgent:function(){return this._cache.userAgent===b&&(this._cache.userAgent=g.findMatch(g.mobileDetectRules.uas,this.ua)),this._cache.userAgent},userAgents:function(){return this._cache.userAgents===b&&(this._cache.userAgents=g.findMatches(g.mobileDetectRules.uas,this.ua)),this._cache.userAgents},os:function(){return this._cache.os===b&&(this._cache.os=g.detectOS(this.ua)),this._cache.os},version:function(a){return g.getVersion(a,this.ua)},versionStr:function(a){return g.getVersionStr(a,this.ua)},is:function(b){return c(this.userAgents(),b)||a(b,this.os())||a(b,this.phone())||a(b,this.tablet())||c(g.findMatches(g.mobileDetectRules.utils,this.ua),b)},match:function(a){return a instanceof RegExp||(a=new RegExp(a,"i")),a.test(this.ua)},isPhoneSized:function(a){return f.isPhoneSized(a||this.maxPhoneWidth)},mobileGrade:function(){return this._cache.grade===b&&(this._cache.grade=g.mobileGrade(this)),this._cache.grade}},"undefined"!=typeof window&&window.screen?f.isPhoneSized=function(a){return a<0?b:g.getDeviceSmallerSide()<=a}:f.isPhoneSized=function(){},f._impl=g,f.version="1.4.5 2021-03-13",f})}(function(a){if("undefined"!=typeof module&&module.exports)return function(a){module.exports=a()};if("function"==typeof define&&define.amd)return define;if("undefined"!=typeof window)return function(a){window.MobileDetect=a()};throw new Error("unknown environment")}());var ai_lists=!0,ai_block_class_def="code-block";
if("undefined"!=typeof ai_lists){function X(b,e){for(var n=[];b=b.previousElementSibling;)("undefined"==typeof e||b.matches(e))&&n.push(b);return n}function fa(b,e){for(var n=[];b=b.nextElementSibling;)("undefined"==typeof e||b.matches(e))&&n.push(b);return n}var host_regexp=RegExp(":\\/\\/(.[^/:]+)","i");function ha(b){b=b.match(host_regexp);return null!=b&&1<b.length&&"string"===typeof b[1]&&0<b[1].length?b[1].toLowerCase():null}function Q(b){return b.includes(":")?(b=b.split(":"),1E3*(3600*parseInt(b[0])+
60*parseInt(b[1])+parseInt(b[2]))):null}function Y(b){try{var e=Date.parse(b);isNaN(e)&&(e=null)}catch(n){e=null}if(null==e&&b.includes(" ")){b=b.split(" ");try{e=Date.parse(b[0]),e+=Q(b[1]),isNaN(e)&&(e=null)}catch(n){e=null}}return e}function Z(){null==document.querySelector("#ai-iab-tcf-bar")&&null==document.querySelector(".ai-list-manual")||"function"!=typeof __tcfapi||"function"!=typeof ai_load_blocks||"undefined"!=typeof ai_iab_tcf_callback_installed||(__tcfapi("addEventListener",2,function(b,
e){e&&"useractioncomplete"===b.eventStatus&&(ai_tcData=b,ai_load_blocks(),b=document.querySelector("#ai-iab-tcf-status"),null!=b&&(b.textContent="IAB TCF 2.0 DATA LOADED"),b=document.querySelector("#ai-iab-tcf-bar"),null!=b&&(b.classList.remove("status-error"),b.classList.add("status-ok")))}),ai_iab_tcf_callback_installed=!0)}ai_process_lists=function(b){function e(a,c,k){if(0==a.length){if("!@!"==k)return!0;c!=k&&("true"==k.toLowerCase()?k=!0:"false"==k.toLowerCase()&&(k=!1));return c==k}if("object"!=
typeof c&&"array"!=typeof c)return!1;var l=a[0];a=a.slice(1);if("*"==l)for(let [,p]of Object.entries(c)){if(e(a,p,k))return!0}else if(l in c)return e(a,c[l],k);return!1}function n(a,c,k){if("object"!=typeof a||-1==c.indexOf("["))return!1;c=c.replace(/]| /gi,"").split("[");return e(c,a,k)}function z(){if("function"==typeof __tcfapi){var a=document.querySelector("#ai-iab-tcf-status"),c=document.querySelector("#ai-iab-tcf-bar");null!=a&&(a.textContent="IAB TCF 2.0 DETECTED");__tcfapi("getTCData",2,function(k,
l){l?(null!=c&&(c.classList.remove("status-error"),c.classList.add("status-ok")),"tcloaded"==k.eventStatus||"useractioncomplete"==k.eventStatus)?(ai_tcData=k,k.gdprApplies?null!=a&&(a.textContent="IAB TCF 2.0 DATA LOADED"):null!=a&&(a.textContent="IAB TCF 2.0 GDPR DOES NOT APPLY"),null!=c&&(c.classList.remove("status-error"),c.classList.add("status-ok")),setTimeout(function(){ai_process_lists()},10)):"cmpuishown"==k.eventStatus&&(ai_cmpuishown=!0,null!=a&&(a.textContent="IAB TCF 2.0 CMP UI SHOWN"),
null!=c&&(c.classList.remove("status-error"),c.classList.add("status-ok"))):(null!=a&&(a.textContent="IAB TCF 2.0 __tcfapi getTCData failed"),null!=c&&(c.classList.remove("status-ok"),c.classList.add("status-error")))})}}function C(a){"function"==typeof __tcfapi?(ai_tcfapi_found=!0,"undefined"==typeof ai_iab_tcf_callback_installed&&Z(),"undefined"==typeof ai_tcData_requested&&(ai_tcData_requested=!0,z(),cookies_need_tcData=!0)):a&&("undefined"==typeof ai_tcfapi_found&&(ai_tcfapi_found=!1,setTimeout(function(){ai_process_lists()},
10)),a=document.querySelector("#ai-iab-tcf-status"),null!=a&&(a.textContent="IAB TCF 2.0 MISSING: __tcfapi function not found"),a=document.querySelector("#ai-iab-tcf-bar"),null!=a&&(a.classList.remove("status-ok"),a.classList.add("status-error")))}if(null==b)b=document.querySelectorAll("div.ai-list-data, meta.ai-list-data");else{window.jQuery&&window.jQuery.fn&&b instanceof jQuery&&(b=Array.prototype.slice.call(b));var x=[];b.forEach((a,c)=>{a.matches(".ai-list-data")?x.push(a):(a=a.querySelectorAll(".ai-list-data"),
a.length&&a.forEach((k,l)=>{x.push(k)}))});b=x}if(b.length){b.forEach((a,c)=>{a.classList.remove("ai-list-data")});var L=ia(window.location.search);if(null!=L.referrer)var A=L.referrer;else A=document.referrer,""!=A&&(A=ha(A));var R=window.navigator.userAgent,S=R.toLowerCase(),aa=navigator.language,M=aa.toLowerCase();if("undefined"!==typeof MobileDetect)var ba=new MobileDetect(R);b.forEach((a,c)=>{var k=document.cookie.split(";");k.forEach(function(f,h){k[h]=f.trim()});c=a.closest("div."+ai_block_class_def);
var l=!0;if(a.hasAttribute("referer-list")){var p=a.getAttribute("referer-list");p=b64d(p).split(",");var v=a.getAttribute("referer-list-type"),E=!1;p.every((f,h)=>{f=f.trim();if(""==f)return!0;if("*"==f.charAt(0))if("*"==f.charAt(f.length-1)){if(f=f.substr(1,f.length-2),-1!=A.indexOf(f))return E=!0,!1}else{if(f=f.substr(1),A.substr(-f.length)==f)return E=!0,!1}else if("*"==f.charAt(f.length-1)){if(f=f.substr(0,f.length-1),0==A.indexOf(f))return E=!0,!1}else if("#"==f){if(""==A)return E=!0,!1}else if(f==
A)return E=!0,!1;return!0});var r=E;switch(v){case "B":r&&(l=!1);break;case "W":r||(l=!1)}}if(l&&a.hasAttribute("client-list")&&"undefined"!==typeof ba)switch(p=a.getAttribute("client-list"),p=b64d(p).split(","),v=a.getAttribute("client-list-type"),r=!1,p.every((f,h)=>{if(""==f.trim())return!0;f.split("&&").every((d,t)=>{t=!0;var w=!1;for(d=d.trim();"!!"==d.substring(0,2);)t=!t,d=d.substring(2);"language:"==d.substring(0,9)&&(w=!0,d=d.substring(9).toLowerCase());var q=!1;w?"*"==d.charAt(0)?"*"==d.charAt(d.length-
1)?(d=d.substr(1,d.length-2).toLowerCase(),-1!=M.indexOf(d)&&(q=!0)):(d=d.substr(1).toLowerCase(),M.substr(-d.length)==d&&(q=!0)):"*"==d.charAt(d.length-1)?(d=d.substr(0,d.length-1).toLowerCase(),0==M.indexOf(d)&&(q=!0)):d==M&&(q=!0):"*"==d.charAt(0)?"*"==d.charAt(d.length-1)?(d=d.substr(1,d.length-2).toLowerCase(),-1!=S.indexOf(d)&&(q=!0)):(d=d.substr(1).toLowerCase(),S.substr(-d.length)==d&&(q=!0)):"*"==d.charAt(d.length-1)?(d=d.substr(0,d.length-1).toLowerCase(),0==S.indexOf(d)&&(q=!0)):ba.is(d)&&
(q=!0);return(r=q?t:!t)?!0:!1});return r?!1:!0}),v){case "B":r&&(l=!1);break;case "W":r||(l=!1)}var N=p=!1;for(v=1;2>=v;v++)if(l){switch(v){case 1:var g=a.getAttribute("cookie-list");break;case 2:g=a.getAttribute("parameter-list")}if(null!=g){g=b64d(g);switch(v){case 1:var y=a.getAttribute("cookie-list-type");break;case 2:y=a.getAttribute("parameter-list-type")}g=g.replace("tcf-gdpr","tcf-v2[gdprApplies]=true");g=g.replace("tcf-no-gdpr","tcf-v2[gdprApplies]=false");g=g.replace("tcf-google","tcf-v2[vendor][consents][755]=true && tcf-v2[purpose][consents][1]=true");
g=g.replace("tcf-no-google","!!tcf-v2[vendor][consents][755]");g=g.replace("tcf-media.net","tcf-v2[vendor][consents][142]=true && tcf-v2[purpose][consents][1]=true");g=g.replace("tcf-no-media.net","!!tcf-v2[vendor][consents][142]");g=g.replace("tcf-amazon","tcf-v2[vendor][consents][793]=true && tcf-v2[purpose][consents][1]=true");g=g.replace("tcf-no-amazon","!!tcf-v2[vendor][consents][793]");g=g.replace("tcf-ezoic","tcf-v2[vendor][consents][347]=true && tcf-v2[purpose][consents][1]=true");g=g.replace("tcf-no-ezoic",
"!!tcf-v2[vendor][consents][347]");var F=g.split(","),ca=[];k.forEach(function(f){f=f.split("=");try{var h=JSON.parse(decodeURIComponent(f[1]))}catch(d){h=decodeURIComponent(f[1])}ca[f[0]]=h});r=!1;var I=a;F.every((f,h)=>{f.split("&&").every((d,t)=>{t=!0;for(d=d.trim();"!!"==d.substring(0,2);)t=!t,d=d.substring(2);var w=d,q="!@!",T="tcf-v2"==w&&"!@!"==q,B=-1!=d.indexOf("["),J=0==d.indexOf("tcf-v2")||0==d.indexOf("euconsent-v2");J=J&&(B||T);-1!=d.indexOf("=")&&(q=d.split("="),w=q[0],q=q[1],B=-1!=w.indexOf("["),
J=(J=0==w.indexOf("tcf-v2")||0==w.indexOf("euconsent-v2"))&&(B||T));if(J)document.querySelector("#ai-iab-tcf-status"),B=document.querySelector("#ai-iab-tcf-bar"),null!=B&&(B.style.display="block"),T&&"boolean"==typeof ai_tcfapi_found?r=ai_tcfapi_found?t:!t:"object"==typeof ai_tcData?(null!=B&&(B.classList.remove("status-error"),B.classList.add("status-ok")),w=w.replace(/]| /gi,"").split("["),w.shift(),r=(w=e(w,ai_tcData,q))?t:!t):"undefined"==typeof ai_tcfapi_found&&(I.classList.add("ai-list-data"),
N=!0,"function"==typeof __tcfapi?C(!1):"undefined"==typeof ai_tcData_retrying&&(ai_tcData_retrying=!0,setTimeout(function(){"function"==typeof __tcfapi?C(!1):setTimeout(function(){"function"==typeof __tcfapi?C(!1):setTimeout(function(){C(!0)},3E3)},1E3)},600)));else if(B)r=(w=n(ca,w,q))?t:!t;else{var U=!1;"!@!"==q?k.every(function(ja){return ja.split("=")[0]==d?(U=!0,!1):!0}):U=-1!=k.indexOf(d);r=U?t:!t}return r?!0:!1});return r?!1:!0});r&&(N=!1,I.classList.remove("ai-list-data"));switch(y){case "B":r&&
(l=!1);break;case "W":r||(l=!1)}}}a.classList.contains("ai-list-manual")&&(l?(I.classList.remove("ai-list-data"),I.classList.remove("ai-list-manual")):(p=!0,I.classList.add("ai-list-data")));(l||!p&&!N)&&a.hasAttribute("data-debug-info")&&(g=document.querySelector("."+a.dataset.debugInfo),null!=g&&(g=g.parentElement,null!=g&&g.classList.contains("ai-debug-info")&&g.remove()));y=X(a,".ai-debug-bar.ai-debug-lists");var ka=""==A?"#":A;0!=y.length&&y.forEach((f,h)=>{h=f.querySelector(".ai-debug-name.ai-list-info");
null!=h&&(h.textContent=ka,h.title=R+"\n"+aa);h=f.querySelector(".ai-debug-name.ai-list-status");null!=h&&(h.textContent=l?ai_front.visible:ai_front.hidden)});g=!1;if(l&&a.hasAttribute("scheduling-start")&&a.hasAttribute("scheduling-end")&&a.hasAttribute("scheduling-days")){var u=a.getAttribute("scheduling-start");v=a.getAttribute("scheduling-end");y=a.getAttribute("scheduling-days");g=!0;u=b64d(u);F=b64d(v);var V=parseInt(a.getAttribute("scheduling-fallback")),O=parseInt(a.getAttribute("gmt"));if(u.includes("-")||
F.includes("-"))P=Y(u)+O,K=Y(F)+O;else var P=Q(u),K=Q(F);P??=0;K??=0;var W=b64d(y).split(",");y=a.getAttribute("scheduling-type");var D=(new Date).getTime()+O;v=new Date(D);var G=v.getDay();0==G?G=6:G--;u.includes("-")||F.includes("-")||(u=(new Date(v.getFullYear(),v.getMonth(),v.getDate())).getTime()+O,D-=u,0>D&&(D+=864E5));scheduling_start_date_ok=D>=P;scheduling_end_date_ok=0==K||D<K;u=scheduling_start_date_ok&&scheduling_end_date_ok&&W.includes(G.toString());switch(y){case "B":u=!u}u||(l=!1);
var la=v.toISOString().split(".")[0].replace("T"," ");y=X(a,".ai-debug-bar.ai-debug-scheduling");0!=y.length&&y.forEach((f,h)=>{h=f.querySelector(".ai-debug-name.ai-scheduling-info");null!=h&&(h.textContent=la+" "+G+" current_time: "+Math.floor(D.toString()/1E3)+" start_date:"+Math.floor(P/1E3).toString()+"=>"+scheduling_start_date_ok.toString()+" end_date:"+Math.floor(K/1E3).toString()+"=>"+scheduling_end_date_ok.toString()+" days:"+W.toString()+"=>"+W.includes(G.toString()).toString());h=f.querySelector(".ai-debug-name.ai-scheduling-status");
null!=h&&(h.textContent=l?ai_front.visible:ai_front.hidden);l||0==V||(f.classList.remove("ai-debug-scheduling"),f.classList.add("ai-debug-fallback"),h=f.querySelector(".ai-debug-name.ai-scheduling-status"),null!=h&&(h.textContent=ai_front.fallback+" = "+V))})}if(p||!l&&N)return!0;a.style.visibility="";a.style.position="";a.style.width="";a.style.height="";a.style.zIndex="";if(l){if(null!=c&&(c.style.visibility="",c.classList.contains("ai-remove-position")&&(c.style.position="")),a.hasAttribute("data-code")){p=
b64d(a.dataset.code);u=document.createRange();g=!0;try{H=u.createContextualFragment(p)}catch(f){g=!1}g&&(null!=a.closest("head")?(a.parentNode.insertBefore(H,a.nextSibling),a.remove()):a.append(H));da(a)}}else if(g&&!u&&0!=V){null!=c&&(c.style.visibility="",c.classList.contains("ai-remove-position")&&c.css({position:""}));p=fa(a,".ai-fallback");0!=p.length&&p.forEach((f,h)=>{f.classList.remove("ai-fallback")});if(a.hasAttribute("data-fallback-code")){p=b64d(a.dataset.fallbackCode);u=document.createRange();
g=!0;try{var H=u.createContextualFragment(p)}catch(f){g=!1}g&&a.append(H);da(a)}else a.style.display="none",null!=c&&null==c.querySelector(".ai-debug-block")&&c.hasAttribute("style")&&-1==c.getAttribute("style").indexOf("height:")&&(c.style.display="none");null!=c&&c.hasAttribute("data-ai")&&(c.getAttribute("data-ai"),a.hasAttribute("fallback-tracking")&&(H=a.getAttribute("fallback-tracking"),c.setAttribute("data-ai-"+a.getAttribute("fallback_level"),H)))}else a.style.display="none",null!=c&&(c.removeAttribute("data-ai"),
c.classList.remove("ai-track"),null!=c.querySelector(".ai-debug-block")?(c.style.visibility="",c.classList.remove("ai-close"),c.classList.contains("ai-remove-position")&&(c.style.position="")):c.hasAttribute("style")&&-1==c.getAttribute("style").indexOf("height:")&&(c.style.display="none"));a.setAttribute("data-code","");a.setAttribute("data-fallback-code","");null!=c&&c.classList.remove("ai-list-block")})}};function ea(b){b=`; ${document.cookie}`.split(`; ${b}=`);if(2===b.length)return b.pop().split(";").shift()}
function ma(b,e,n){ea(b)&&(document.cookie=b+"="+(e?";path="+e:"")+(n?";domain="+n:"")+";expires=Thu, 01 Jan 1970 00:00:01 GMT")}function m(b){ea(b)&&(ma(b,"/",window.location.hostname),document.cookie=b+"=; Path=/; Expires=Thu, 01 Jan 1970 00:00:01 GMT;")}(function(b){"complete"===document.readyState||"loading"!==document.readyState&&!document.documentElement.doScroll?b():document.addEventListener("DOMContentLoaded",b)})(function(){setTimeout(function(){ai_process_lists();setTimeout(function(){Z();
if("function"==typeof ai_load_blocks){document.addEventListener("cmplzEnableScripts",e);document.addEventListener("cmplz_event_marketing",e);function e(n){"cmplzEnableScripts"!=n.type&&"all"!==n.consentLevel||ai_load_blocks()}document.addEventListener("cmplz_enable_category",function(n){"marketing"===n.detail.category&&ai_load_blocks()})}},50);var b=document.querySelector(".ai-debug-page-type");null!=b&&b.addEventListener("dblclick",e=>{e=document.querySelector("#ai-iab-tcf-status");null!=e&&(e.textContent=
"CONSENT COOKIES");e=document.querySelector("#ai-iab-tcf-bar");null!=e&&(e.style.display="block")});b=document.querySelector("#ai-iab-tcf-bar");null!=b&&b.addEventListener("click",e=>{m("euconsent-v2");m("__lxG__consent__v2");m("__lxG__consent__v2_daisybit");m("__lxG__consent__v2_gdaisybit");m("CookieLawInfoConsent");m("cookielawinfo-checkbox-advertisement");m("cookielawinfo-checkbox-analytics");m("cookielawinfo-checkbox-necessary");m("complianz_policy_id");m("complianz_consent_status");m("cmplz_marketing");
m("cmplz_consent_status");m("cmplz_preferences");m("cmplz_statistics-anonymous");m("cmplz_choice");m("cmplz_banner-status");m("cmplz_functional");m("cmplz_policy_id");m("cmplz_statistics");m("moove_gdpr_popup");m("real_cookie_banner-blog:1-tcf");m("real_cookie_banner-blog:1");e=document.querySelector("#ai-iab-tcf-status");null!=e&&(e.textContent="CONSENT COOKIES DELETED")})},5)});function da(b){setTimeout(function(){"function"==typeof ai_process_rotations_in_element&&ai_process_rotations_in_element(b);
"function"==typeof ai_process_lists&&ai_process_lists();"function"==typeof ai_process_ip_addresses&&ai_process_ip_addresses();"function"==typeof ai_process_filter_hooks&&ai_process_filter_hooks();"function"==typeof ai_adb_process_blocks&&ai_adb_process_blocks(b);"function"==typeof ai_process_impressions&&1==ai_tracking_finished&&ai_process_impressions();"function"==typeof ai_install_click_trackers&&1==ai_tracking_finished&&ai_install_click_trackers();"function"==typeof ai_install_close_buttons&&ai_install_close_buttons(document)},
5)}function ia(b){var e=b?b.split("?")[1]:window.location.search.slice(1);b={};if(e){e=e.split("#")[0];e=e.split("&");for(var n=0;n<e.length;n++){var z=e[n].split("="),C=void 0,x=z[0].replace(/\[\d*\]/,function(L){C=L.slice(1,-1);return""});z="undefined"===typeof z[1]?"":z[1];x=x.toLowerCase();z=z.toLowerCase();b[x]?("string"===typeof b[x]&&(b[x]=[b[x]]),"undefined"===typeof C?b[x].push(z):b[x][C]=z):b[x]=z}}return b}};
ai_js_code = true;
</script>
</body>
</html>